
I saw my first episode of this show while flying back to Melbourne from Washington DC and my poor husband was ready to smother me with my pillow if I didn't stop laughing out loud. Bless.

photo curtesy of www.zdw.com
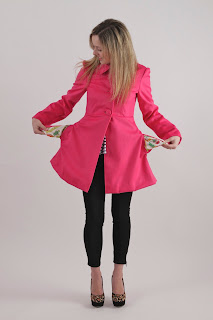
In one scene the lovely Jess played by Zooey Deschanel wears this striking hot pink coat and both my sister and I instantly fell in love with it, so I decided to make a similar version.
I used Butterick Pattern 5145 in a size eight for my gorgeous sister Angeline. It was nice sewing something so small!
I used a stunning wool/cashmere coating from Tessuti Fabrics for the shell of the coat which I purchased from the Melbourne store.

I actually made this pattern over a year ago for myself in a gorgeous green (also from Tessuti) but it was before I started this blog so I've never posted about it before. Here are a few pics of the green coat:


I'm having serious face-fail in this photo. Dear. Lord.
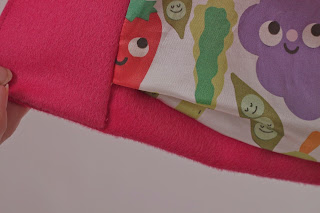
For the lining of this coat I used an awesome print that I found on spoon flower. It's called 'Fruit and veggie madness fabric' by heidikenney I love her quirky designs, and they are perfect for the lining of a coat! I had it printed on a silk/cotton blend.


For those of you that are not familiar with Spoon Flower, it's an awesome website where you can upload your own fabric designs and have them printed on a number of different fabric types. You can also purchase other peoples designs, which is what I've done here. It's such an awesome idea!
So let's talk construction:
The Jacket
I made view C with the length of View B in a straight size 8.


It closes with three button holes, has a peter pan collar, and a lovely box pleat in the back skirt of the coat.
The Lining
The coat is fully lined, so it looks pretty on the inside and out.


Favourite Bits
My favourite features of this coat is the cute little peter-pan collar ...


... and the sneaky little side pockets.

And just to be a bit of sewing nerd, look how the fruit on the lining matches up on the inside pleat!


But before you start calling me a genius, I must admit that this was actually a complete FLUKE. A glorious, serendipitous accident.
Changes I made
Bound Button Holes
Instead of doing the regular machine buttons holes, I thought I'd challenge myself and try bound-button holes. I absolutely love the effect! It is a lot more time consuming, mainly because you have to make sure that you make everything absolutely the same so that you don't end up with uneven button holes, and also because it's my first time so I'm slow.


Yes they take a lot longer but they are well worth the effort. They are neat, strong and I reckon they look so much nicer on a coat! Now-a-days you only would ever see these type of button holes on couture items in the stores. Infact, if you opened up your own closet you'd be hard pressed to find any purchased garment that didn't have a machine stitched button hole.
Here's a comparison picture of a bound button hole and a machine button hole.


Images curtesy of Threads Magazine and Wikipedia
I ordered my fabric covered buttons from Button Mania Yes I know I could do them my self, but this is so much easier for a time poor lass, and Kate from Button Mania is a perfectionist so you know you are going to get good quality.

For extra movement in the lining I added a little pleat in the corner of the lining hem. This allows the lining to move up and down at the hem when you do. Stops potential tearing.
Conclusion
I love how this coat turned out and how well it fits my sister Angeline. It's definitely heating up in Australia, so my sister is going to have to wait a while before she can wear it.


Melbourne is known for being a sea of black clothes, so I like the fact that this pink coat will definitely stand out in a crown of muted colours.