Well poke me in the eye with a seam ripper. I can't believe it's been over 2 1/2 months since my last blog post! I blame in part seasons 1-3 of 'The Walking Dead'; what is it about a zombie apocalypse that is so freaking addictive? But mainly I have been a very busy lady.
Here's a quick catch up:
- I just got back from vacationing in Italy (amazing!!) with a six month old child (wow) and bought myself a lot of stunning Italian leather and lace
- I'm currently a judge in the fabulous 'Super Online Sewing Match' hosted by Sew Mama Sew which is absolutely inspiring. Check the competition out if you haven't already!
- I'm also involved with another exciting upcoming project which I can't tell you about yet, but I'm so looking forward to. Oh how sneaky!
- I'm taking part in the Handmaker's Factory Miette Cardigan Knit-A-long and you should too! Yeah that's right, I knit now; like a boss.
- I've made a bunch of clothes that I will be posting about soon.
- Just completed a short course in Pattern Making and absolutely loved it! I am a little bit in love with Kate the teacher who knows her shiz.
- And finally, you may have noticed that my blog has been given a bit of a make over!
Tutorial: How to move a dart
One of the simple and effective things that I learnt and loved from my recent course in Pattern Making, is how to move darts and and create design lines without cutting and slashing your pattern. It amazes me how easy this is. Maybe you have a bodice you want to make out of lace and the darts are in a position that interupts the flow of the lace pattern. This tutorial will show you how to move that dart to where ever you choose.
Things you'll need:
- Bodice pattern piece
- Tracing paper
- Pencil and eraser
- Ruler
- Awl
- Tracing wheel
- One Long Island Iced Tea - for pattern making inspiration
- Really old nail polish job. Wow my nails look ah-maz-ing
Let's Do This
Summary
The images below show the original pattern with two darts, and our final pattern with the darts moved into one at the side.
Tracing your original pattern
1. Get your bodice front pattern piece. Trace off a copy if you don't want to mark your original. I have drawn mine onto a piece of cardboard for more stability.
Note: My pattern piece doesn't have seam allowance added yet. I find it easier to see the true shape of the pattern without getting confused with allowances.
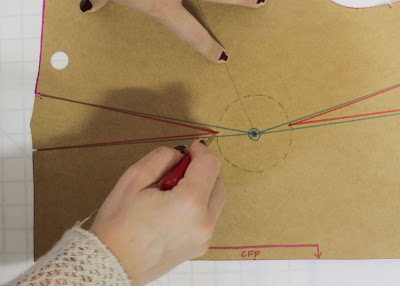
2. Find your bust point on your pattern and make a mark there for your reference. The bust point is drawn in
blue, and the original darts I have drawn in
red.
Tip: If your pattern doesn't have the bust point marked, hold up the pattern piece on yourself or on a dress form and mark with a pen the fullest point of your bust. This will be your bust point. Generally the darts are pointed towards the bust point.
3. Draw a circle around the bust point with a
radius of 3cm. You can see mine in
green.
Note: The length of the radius is up to you, generally the smaller circle is for a smaller bust and the larger for the fuller bust.
See that lovely circle we just made around the bust point? That's our no-go dart zone. This will make sense soon.
Positioning your new dart
4. On your pattern piece draw a line where you would like your dart to go. Your line will need to start from the edge of the pattern piece and finish at the bust point. I have done mine in pencil.
Tip: If you are moving a dart to a side seam, draw the line on an angle and not horizontally which is more flattering and looks more pleasing to the eye.
5. Place your pattern piece on top of a large piece of blank tracing paper. Mark on your tracing paper where your bust point is.
Starting at the line you have just drawn you are going to trace your pattern piece in one direction, until you come to your first pre-existing dart.
Tip: Keep the pattern piece as steady as you can to avoid distorting the shape. Place a weight over the centre if it helps.
Closing off the original darts
In the next steps we are going to remove the original darts and create our new dart.
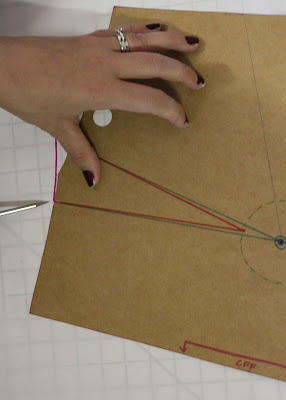
6. Once you come to your first dart, mark a notch at the first dart leg for your reference. Using your awl at the apex of your dart carefully pivot your pattern piece until the second leg of the dart lines up with the notch of the first leg.
Tip: If you don't have an awl, you can use a sharp pencil or the point of a fine pair of scissors to act as your pivot tool.
See how the pattern piece has now moved?! You have just closed off that dart!
7. Continue tracing around the pattern piece until you come to you next dart and repeat the process.
Once you have no more darts on your pattern, continue tracing until you come to your dart line that you drew on to your pattern piece and stop.
Completing the new dart
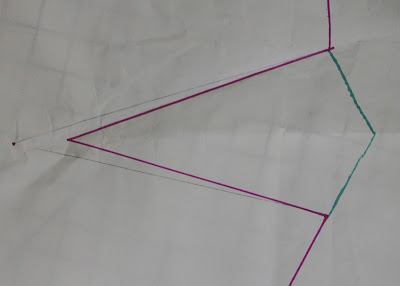
8. Remove your pattern from the tracing paper and have a look! See that big open gape, that's your new dart! (almost)
9. With a pencil and a ruler, draw in your dart legs going all the way into the bust point.
Remember your no-go dart zone? Make a mark at the edge of the bust circle (3cm away from bust point), making sure that it is centred between the two openings.
10. Draw your two dart legs from that new apex to the openings on your pattern piece. This is your new dart! Depending on how close the base of the dart is to the bust point, will determine how long or how wide the dart is. But don't worry, the dart value is still the same.
Tip: Both dart legs should be exactly the same length, so get your ruler and make sure they are the same.
11. Now you will carefully fold one of the dart legs to meet the second so that the dart is closed off. Score the new dart legs with a pen or pencil to make it easy to fold.
Tip: The direction of the dart is up to you, but generally the bulk of the dart is folded towards to the centre of the garment.
Tip 2: By folding your dart you're making the piece 3D. To make it easier to fold, place the apex of the dart on the corner of a table.
12. If traced correctly, your two dart legs should meet so that it becomes one continuous line. With your tracing wheel, trace over the dart edge where the bulk of the paper is folded under.
13. Open up your pattern piece. The dots on your pattern made by your tracing wheel is the finished shape of your dart. Trace over it with a pencil.
Tip: If you don't have a tracing wheel, use an awl or the edge of a pair of scissors to mark along the line instead.
14. Add your seam allowance to your pattern piece and you're done! You now have a new bodice with your measurements, but with the dart in a different spot!
15. It's Long Island Iced Tea time - you're done!
What do you think guys? Are you going to give this a go?
Have fun with your new patterns!
 1. Starting the knit-a-long 2. Fabric splurge in Italy 3. My finished knitted sleeve 4. Harry and I on the beach in Italy.