

That's the face of someone who just made her SECOND LEATHER JACKET!!
THE DETAILS
The Pattern
I used the 'Eddie Biker Vest' pattern by STYLE ARC as my block pattern and then changed the design to create what I was after.
This pattern comes with a huge range of sizes from a 4 to a 30 and I made this in a size 6.
I was measuring around a size 8-10 but I wanted something more fitted and this jacket comes with a fair bit of ease.
The pattern is a VEST so I added sleeves in a size 36 from Burdastyle 108B. I made my first leather jacket (below) using 108B but in a size 38.
 |
| The first Leather Jacket - Click to view |


For the first time ever I visited the magical land that is Leffler's Leather.
They sell LEATHER wholesale to the industry and to the public and have a stunning range of colours. If you live in Melbourne, Australia you have to check this place out.
I used a sheepskin leather in a mushroom/tan colour which had a slightly heavier weight than a nappa hide.
The jacket is LINED with beautiful silk that I purchased from The Fabric Store a few years ago.
The beautiful rose gold ZIPPERS are purchased from Jimmy Buttons.


Inspiration


Changes
The Style Arc pattern served as a great block for me to redesign. It was challenging but fun reworking the pattern with the many changes, so I learnt a real lot!
The main changes I made was:
- Removed FACINGS from armholes and extended the lining so that I could add sleeves.
- Added SHOULDER PADS - structured jackets just look so nice with a defined shoulder.
- Covered the exposed ZIPPER TAPE with leather binding.


Look Out For
If you're going to give this pattern a go here are somethings to keep in mind before you get started:
Topstitching - The pattern gets you to do topstitching as a 3cm border around the edge of the jacket. Out of personal preference I chose to do my topstitching close to the seam and hem.
Instead of top stitching as you go, as the pattern suggests I recommend you WAIT until you've finished the whole jacket before you do this. Access is easier, and you can assess the natural drape of the jacket before adding your decorative stitching.
Bagging out the Jacket - You know what's not fun? Hand sewing leather. Ask me how I know.
The pattern instructs you to leave an open gap at the base of the neck where the facing and the lining meet. This is where you 'bag out' or turn out the jacket. This is ok if you are sewing with woven fabrics. If you are using a challenging fabric like leather I suggest you leave a hole in one of the back princess seams or the centre back of the lining.
It is much easier to hand sew the closure of the lining than it is to hand-sew leather and as a result, will look a lot neater.
Zipper - The design of this jacket has you attach the zipper on top of the fabric alongside a seam line but not actually sewn INTO a seam line. This means that the zipper tape sits naked on top of the garment.
It bothered me; on my jacket the zipper looked like an after thought.
Unfortunately for me I had already sewn up my whole jacket and there is no un-picking leather!
After a lot of brainstorming I decided to make my own leather binding. I attached it by topstitching it over the zipper tape. I feel that it gives it a cleaner more finished look.


Instructions - Though the pattern pieces and design are EXCELLENT, the instructions were a little simple. Admittedly Style Arc have listed this pattern as 'advanced' so there is an assumed knowledge. The included diagrams were useful but the written instructions were short and not always clear.
The main challenge with this pattern is the turning out of the collar and hem and once you have done that the rest is easy enough to follow, though a beginner may struggle with understanding how to tackle some of the steps.
If you have a bit of experience however and read through the instructions thoroughly before starting, you will really enjoy this well drafted pattern.
Love
I don't know how, I don't know why but the SLEEVES from BurdaStyle 108B in the size 36 FIT PERFECTLY into the size 6 Style Arc Vest. I love it when that happens!
The HIGH COLLAR was an idea I couldn't get out of my head and I'm so pleased with the shape and the look of my edited version.
I love a metal ZIPPER and the rose gold of these zippers just worked so perfectly with the tan of the leather.


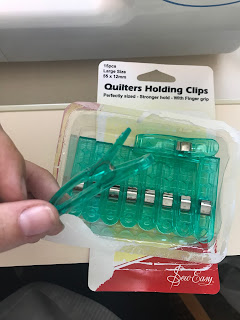
Quilters Holding Clips
I wish I'd known about these the first time I made a leather jacket!
Using pins is hard work on such a tough fabric, and these clips hold everything in place with 'finger-grip'.

Top Stitch your Seams
You can't iron leather. Well technically you can, but it doesn't behave like regular fabric and some leathers can be damaged by the heat.
To keep your seams flat and pretty, try top-stitching along either side of every seam line. It stops the seam line from curving and makes the jacket look really finished.

Cutting Out your Leather
Leather is slippery and has lots of body so I don't recommend folding it and cutting. Instead take the time to trace out a MIRRORED version of each pattern piece and then cut out each piece of leather individually. It also helps to arrange every pattern piece on your fabric before you cut out to minimise wastage.
Use Sticky Tape
When cutting out your pattern pieces use good old fashioned sticky tape instead of pins to cut your pieces out.
Sticky tape also comes in handy when attaching items like zippers that can't be pinned on or clipped on with holding clips.
Leather Needle
A leather needle is vital for sewing with leather! I used my normal Janome sewing machine (DC2101) to make my jacket and a nice sharp leather needle (size 14). Once you've finished your jacket throw out the needle; you may even need to swap for a new one half way through your project if you are doing a lot of top stitching. All that tough fabric will make your needle blunt! Blunt needle = ugly seams.
Change your Foot
For most of this jacket I used a normal sewing foot, which meant I got really good at holding (fighting with!) the fabric the whole way through to stop the leather from sliding around. When you sew with leather the top layer tends to walk forward making your two pieces uneven.
I highly recommend using a 'walking foot' also known as an 'even feed foot'. It made such a difference for me and I can't believe I waited this long to use one; a complete game changer.
A walking foot is designed with a set of feed dogs (teeth) which allow the fabric to feed without shifting and eliminates the problem of the under layer of fabric coming up short.
Thread Length
I changed my thread length from the standard 2.4 on my Janome to a 3. The thickness of the leather demands a longer stitch. A short stitch disappears in the leather, is too tight and could end up tearing your precious leather.


Final Thoughts
For those of you thinking about using leather for the first time, take heart! At the end of the day sewing is 90% preparation and only 10% on the machine. There's heaps of information out there about working with leather and if you make a muslin and have a little play with the leather first you will be A OK.
You want to start with a NAPPA leather, which is a fine and light-weight lamb hide which behaves more like fabric.
This is one of those projects that I get immense satisfaction out of because I took the time to get it right. I made a muslin, redrafted the pattern and then made another draft to double check all the changes.
All that time and effort put in before starting the real thing ensured that I got just the right look and fit. It's just another reminder that even though sewing is exciting and the temptation is to get straight into it, the patience of making a muslin ALWAYS pays off. In fact it actually increases the amount of joy you get out of your finished piece!
I'm so pleased with my second leather jacket and I can't wait to try out another Style Arc pattern!
 |
| Me wearing my new jacket for the first time to a wedding. Nothing says 'beach' like wearing a leather jacket. |
You want to start with a NAPPA leather, which is a fine and light-weight lamb hide which behaves more like fabric.
This is one of those projects that I get immense satisfaction out of because I took the time to get it right. I made a muslin, redrafted the pattern and then made another draft to double check all the changes.
All that time and effort put in before starting the real thing ensured that I got just the right look and fit. It's just another reminder that even though sewing is exciting and the temptation is to get straight into it, the patience of making a muslin ALWAYS pays off. In fact it actually increases the amount of joy you get out of your finished piece!





