Julia Bobbin Header Image and Menu Past Projects Tutorials Celebrity Copy Cat Awards About Me
Showing posts with label vintage. Show all posts

Thursday, 5 December 2019

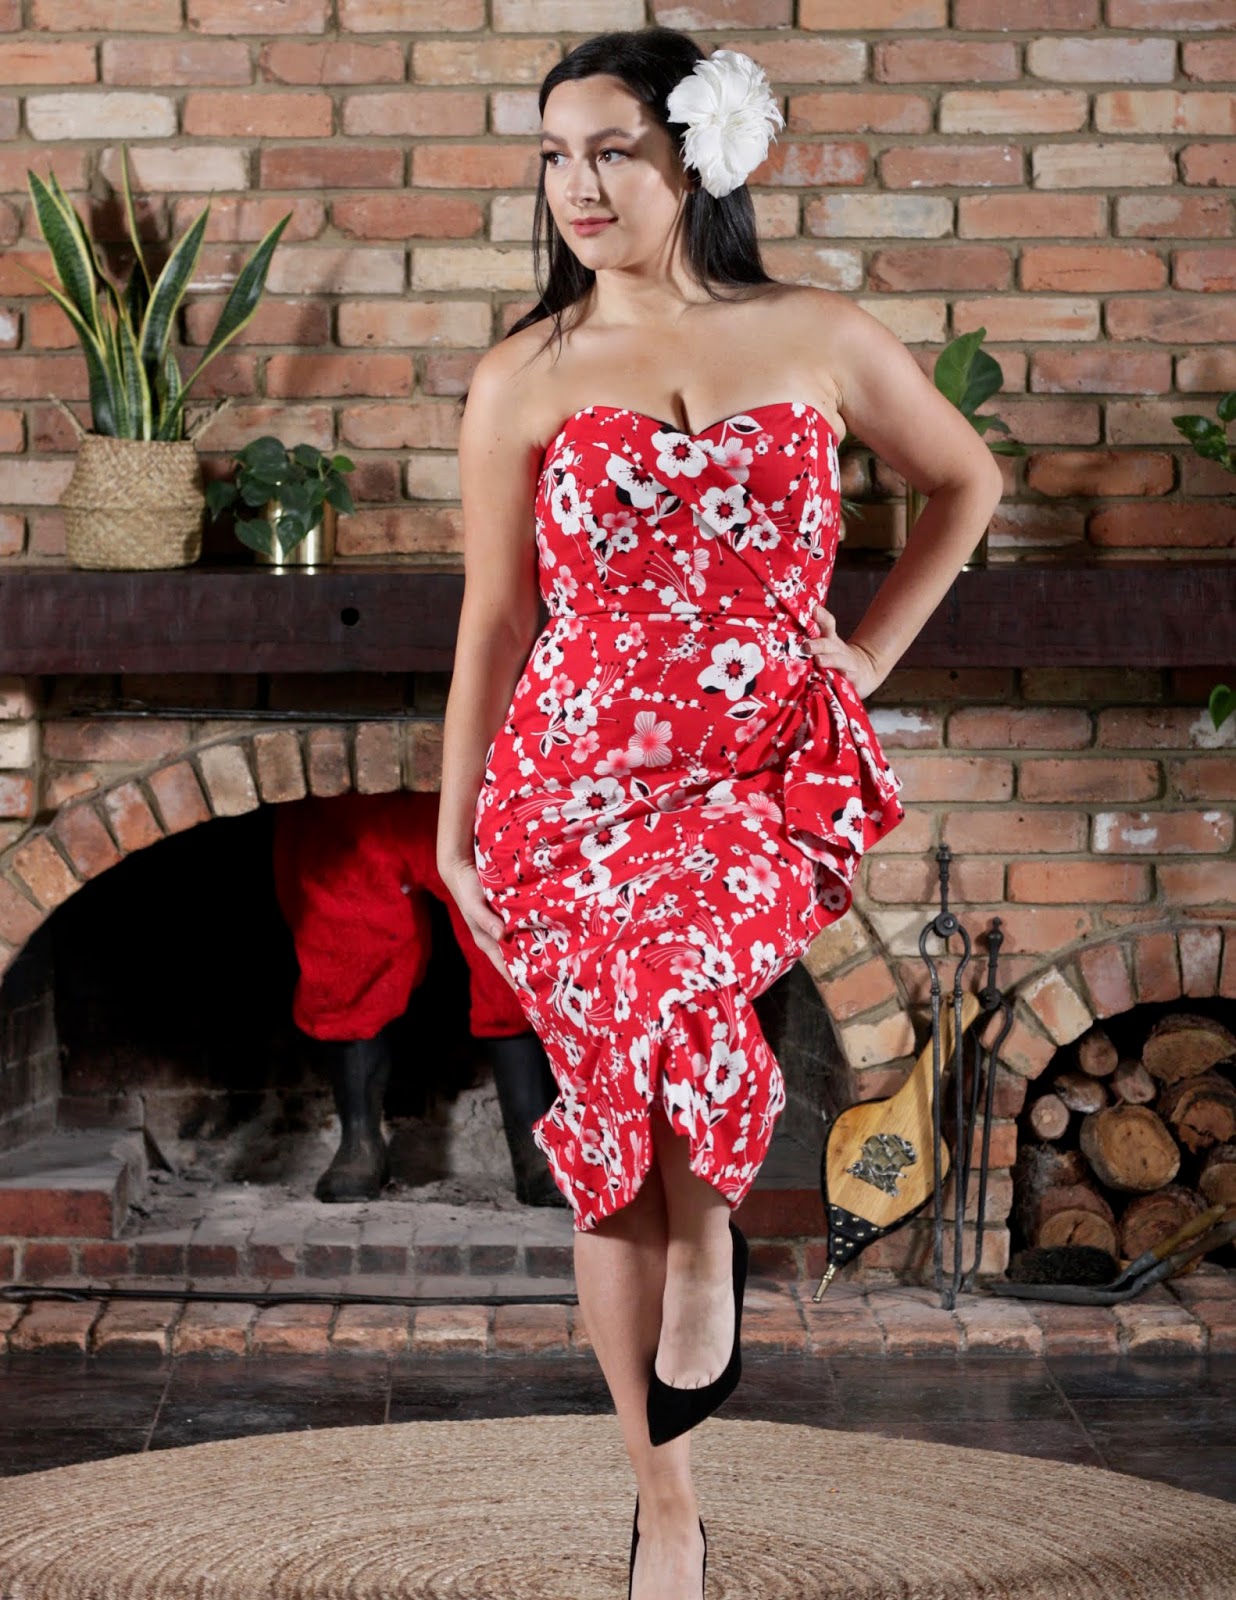
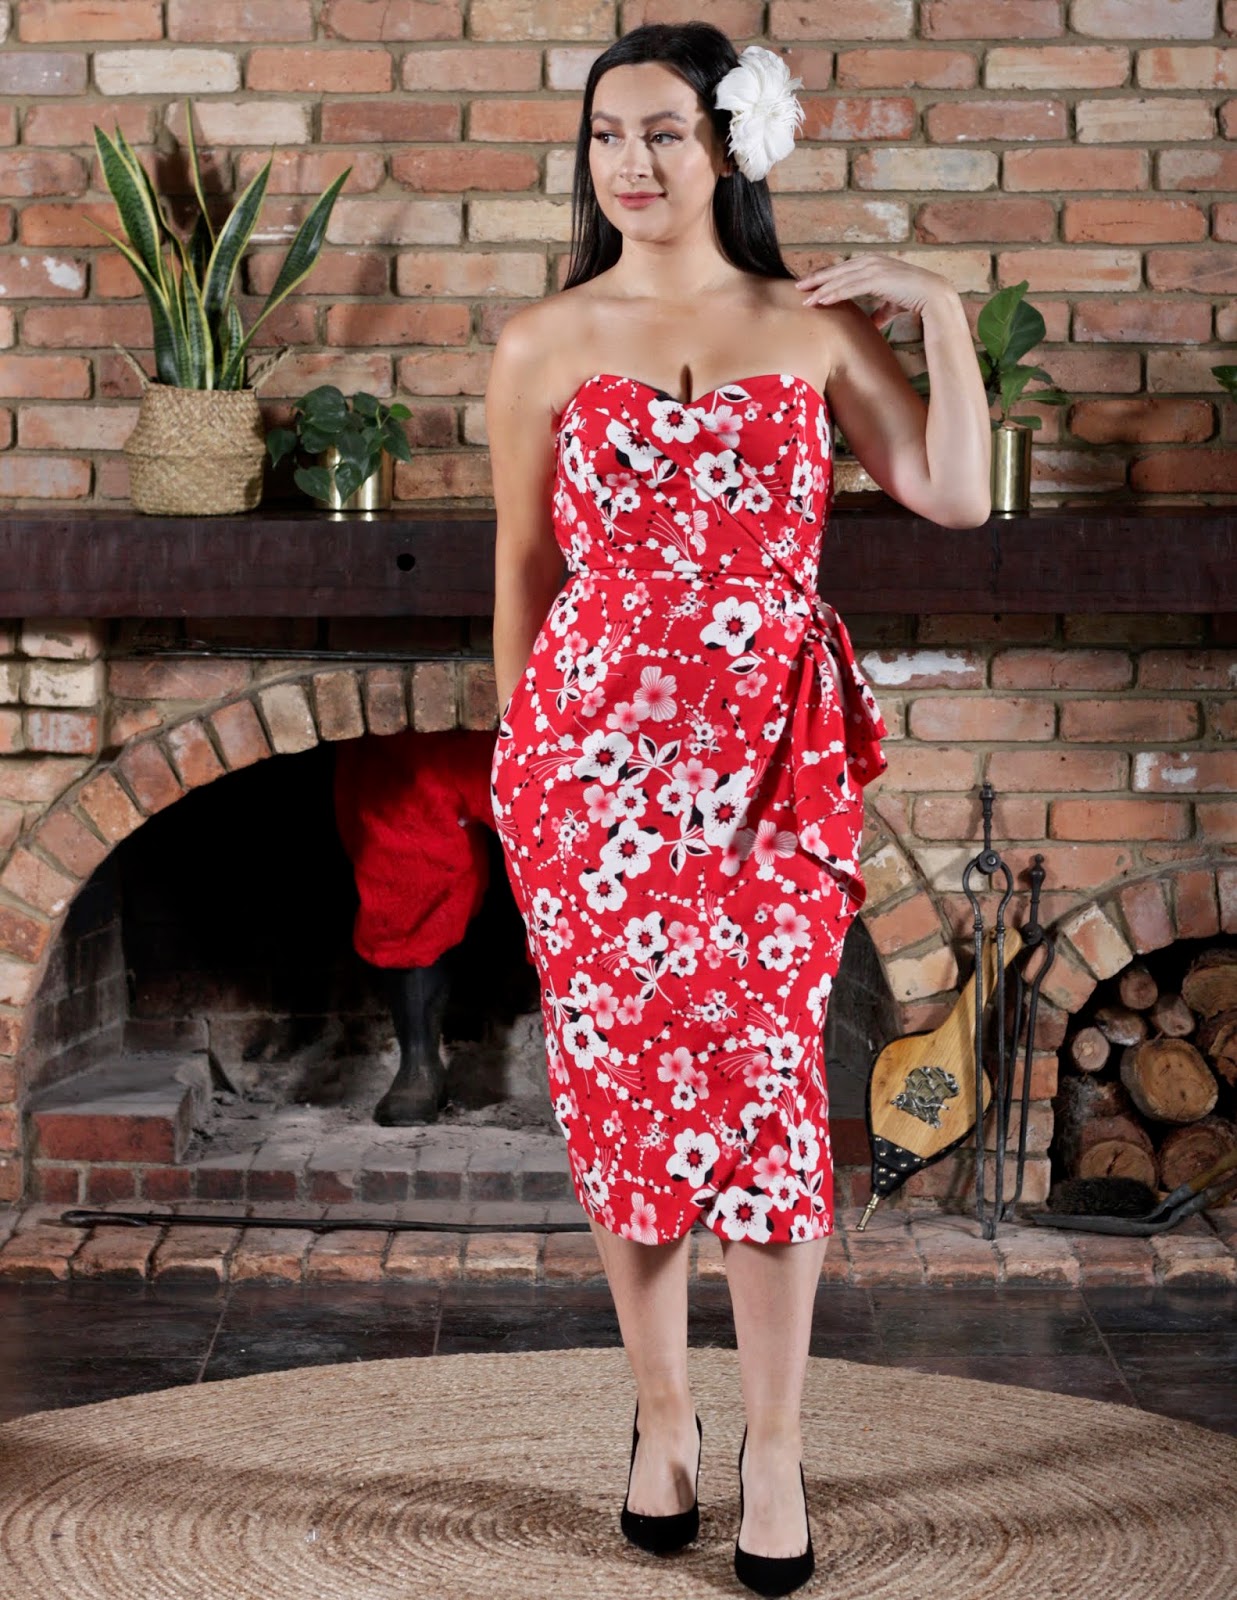
The Lamour Dress - Charm Patterns By Gertie and SEWN MAGAZINE FEATURE

Julia Bobbin - Lamour Dress by Charm Patterns by Gertie

Well look at that, your girl is in a VINTAGE DRESS! 

When I first started sewing, my favourite thing to make was vintage dresses. I still dearly love vintage fashion, but over the years my style has evolved with more of a modern influence.

So when Michelle from Sewn Magazine messaged me and asked if I'd like to feature in their fabulous magazine and would I mind making something VINTAGE (and with a Christmas theme!), I jumped at the chance!!

Julia Bobbin - Lamour Dress by Charm Patterns by Gertie

The Pattern

It's the Lamour Dress by Charm Patterns by Gertie. This pattern has recently been updated and expanded, ranging from size 2 (US) to 20 and cup sizes A to H.

With different bodice, skirt and finishing options, there are 18 different dress combinations that you can make with this one clever pattern.

I made the princess seamed bodice with bodice sash, and the sarong skirt.

Sizing

I originally cut a size 10 and after making the toile, went down to a size 8.

As is suggested in the pattern, if you want minimal ease in your dress (i.e. more fitted to the body) it is better to choose your size based on the 'finished measurements', rather than the 'recommended measurements' chart.

I am larger busted but maybe because of my shorter torso combined with a bodice that is strapless and not covering the complete breast area,  the A/B cup version fit me well. I find this is often the case when I sew strapless patterns.

Julia Bobbin - Lamour Dress by Charm Patterns by Gertie

The Fabric

I used a beautiful quilting cotton from GJ's Fabrics and the print was perfect for this Christmas themed, tiki style vintage dress!

It was also nice to branch out to more a loud print! I typically sew with solid colours. They're often bright colours(!) but solid, so this felt different for me and I really enjoyed it!

The bodice is underlined with silk organza and lined with a polyester lining.

The Details

More and more these days I get excited by garments that have more engineering and structure on the inside. Typically this requires more time, but I really enjoy this type of sewing and it has never failed to produce a garment that is more likely to be worn and loved.

This dress has a bodice with THREE LAYERS - the garment fabric (the part you see on the outside), underlining (the middle layer) and the lining (the layer that touches your body).

THE BONING AND CHANNELS were attached to the lining layer, which was new for me.
In the past I have placed the channels on the middle layer (the underlining) which is then sandwiched by the other two layers. The result was just as effective in any case.

The hem of this FAUX WRAP SKIRT comes with a HEM FACING which I absolutely love.
The long width of the facing gives the hem body and weight, which is missing from so many modern dresses these days. It also ensures the shape of the hem is exact and not distorted.

The dress is closed with a LAPPED ZIPPER which I think looks so beautiful on a vintage dress, and the lining of the bodice is HAND STITCHED to the garment waistline.

Julia Bobbin - Lamour Dress by Charm Patterns by Gertie

Look Out For

With all the construction and shaping of this dress, it is really important to make a muslin/toile first. You don't want to go to all that effort for a dress that doesn't fit right, and in this type of silhouette, a poor fit is hard to hide.

The instructions for this pattern are wonderful and well thought out, but even still the construction of the flounce and faux wrap can take a little bit to get your head around. Making a muslin means you get to practise the steps without making irredeemable mistakes on the real thing.

Final Thoughts

What an honour and thrill it was to be featured in the Nov/Dec issue of Sewn Magazine 2019!
I'm so grateful to be included amongst such talented seamstresses and thoroughly enjoyed re-visiting my love for vintage sewing!

Julia Bobbin - Lamour Dress by Charm Patterns by Gertie

Friday, 4 January 2019

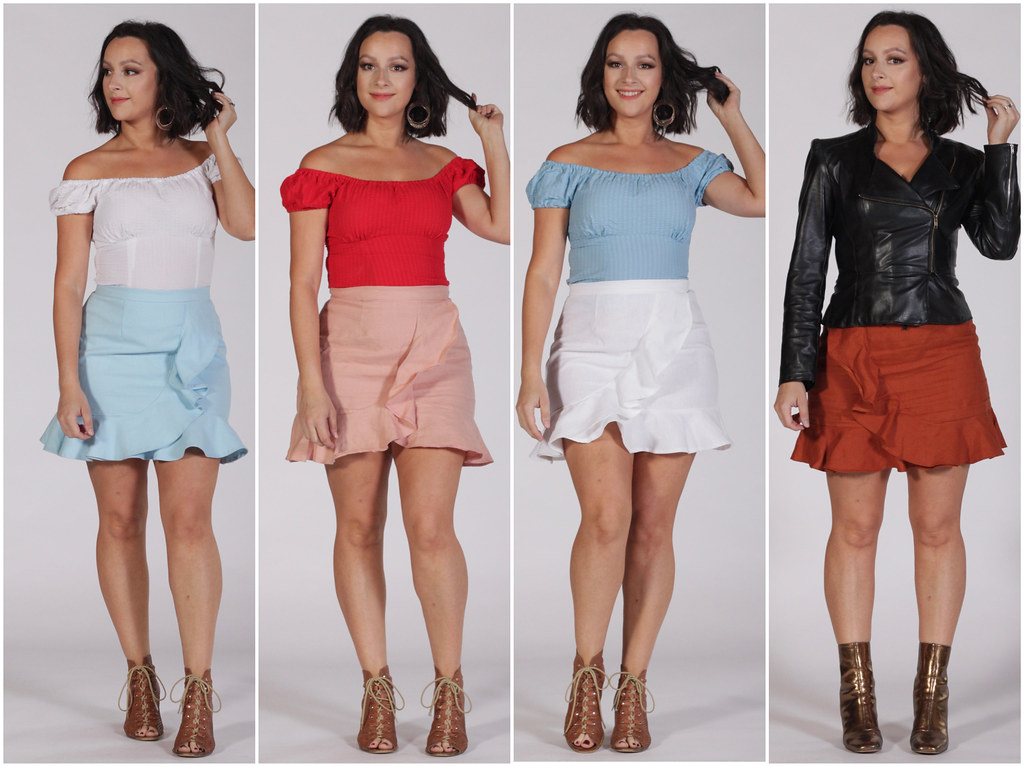
The Rita Blouse(s) + Linen Flounce Skirts

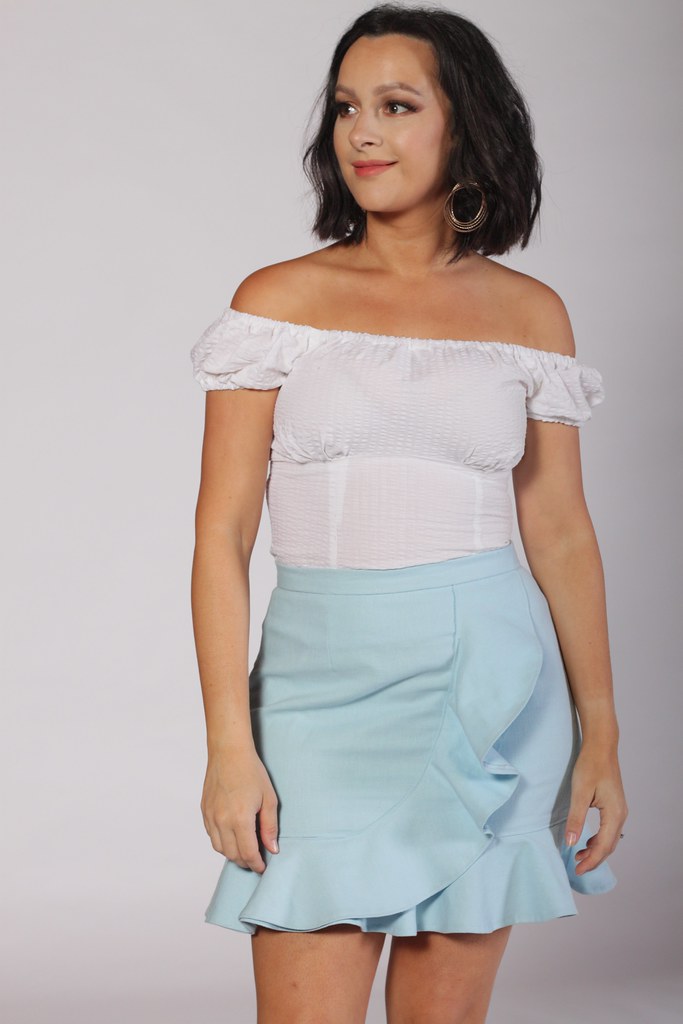
Rita Blouse and Flounce Skirt - Julia Bobbin

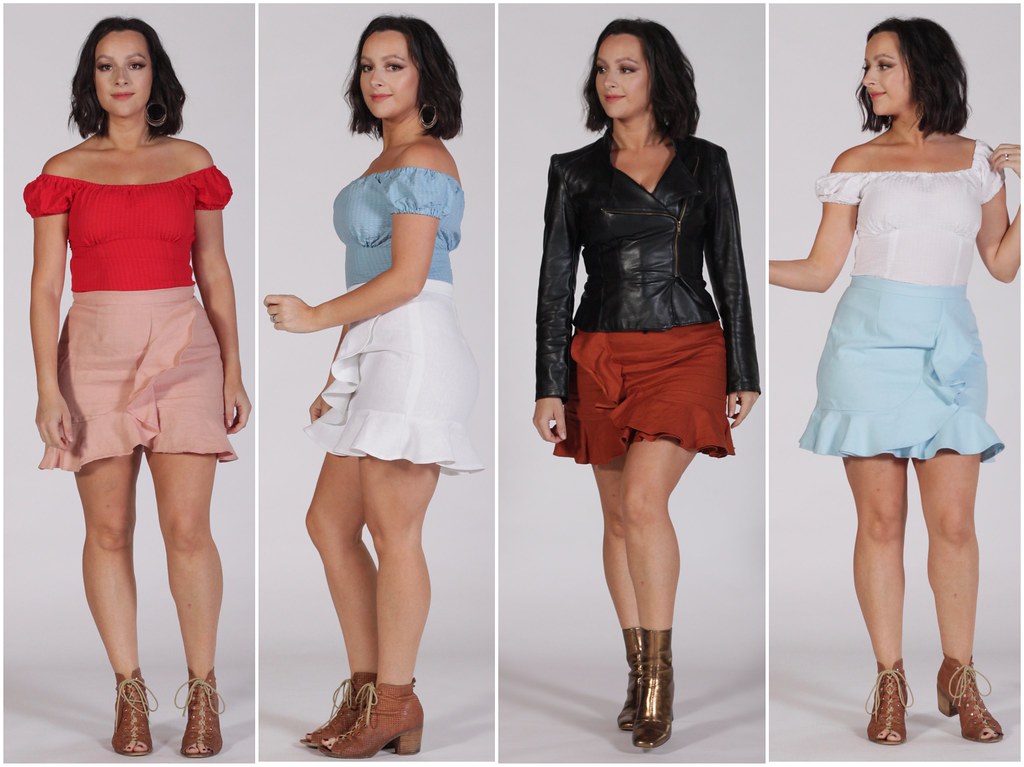
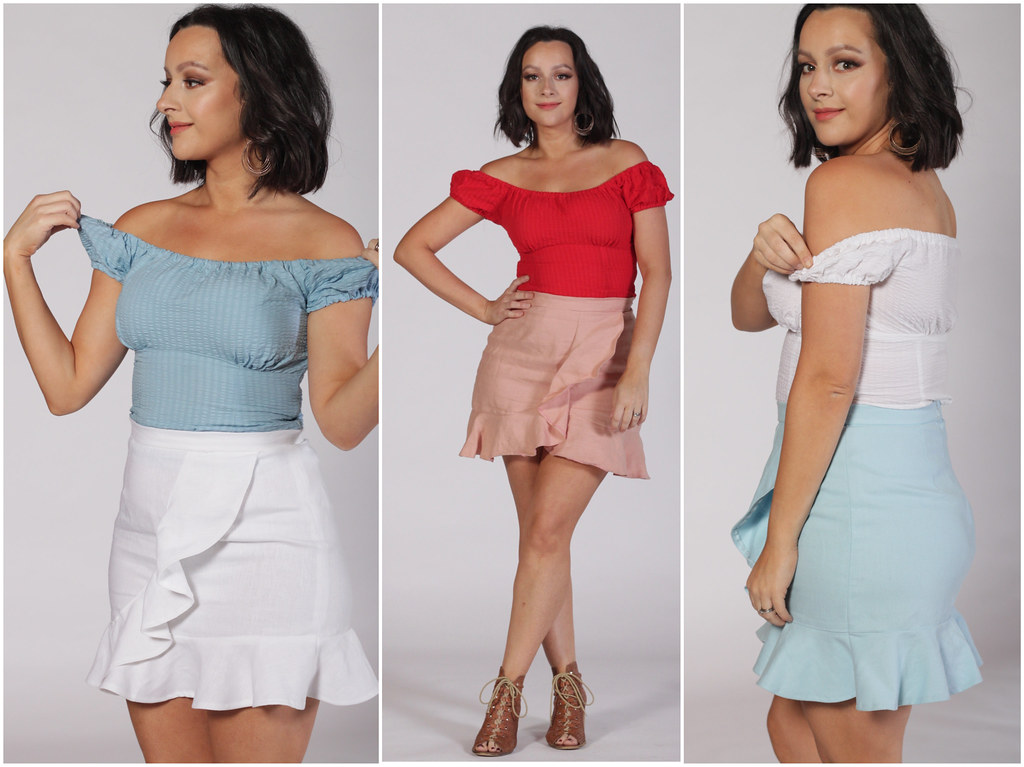
Sometimes when you like a pattern, you just got to back up that make with another three (or four). Cause when I like something, I like it HARD.

Rita Blouse and Flounce Skirt - Julia Bobbin

The Pattern

Blouse
It's the Rita Blouse by Charm Patterns.
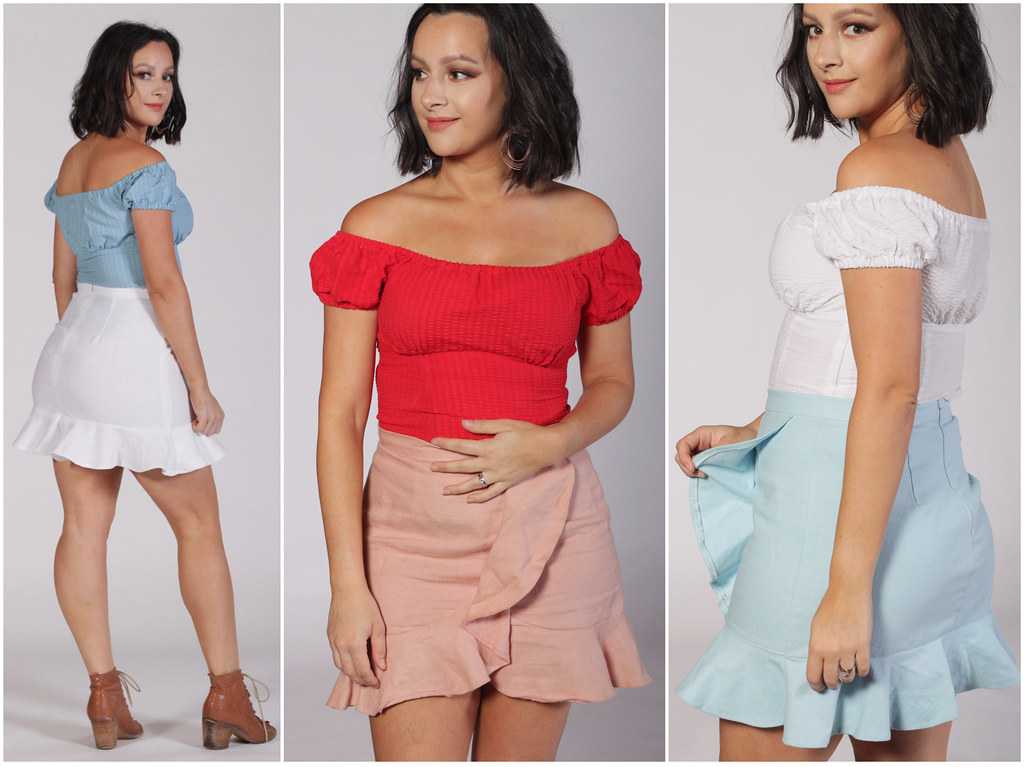
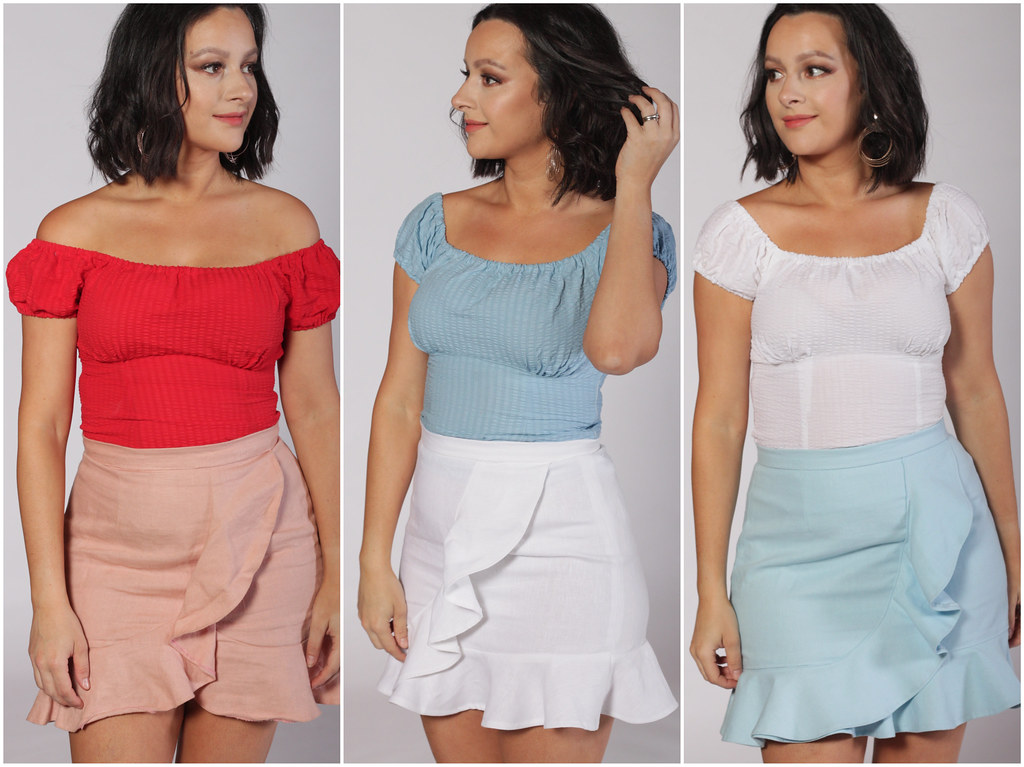
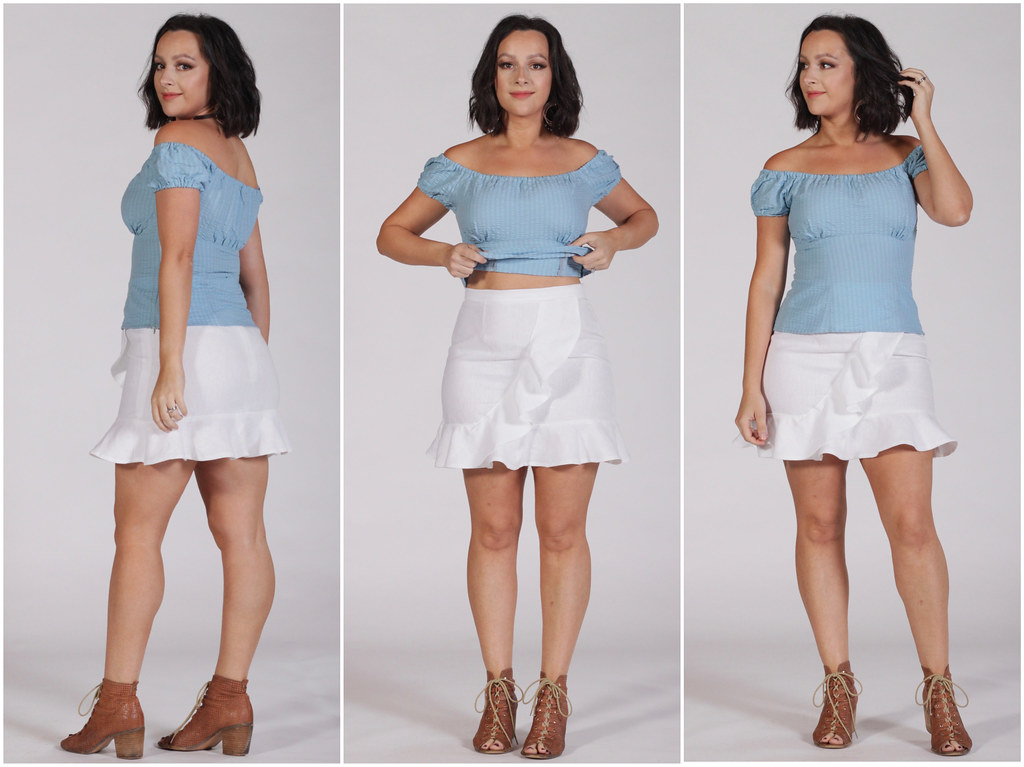
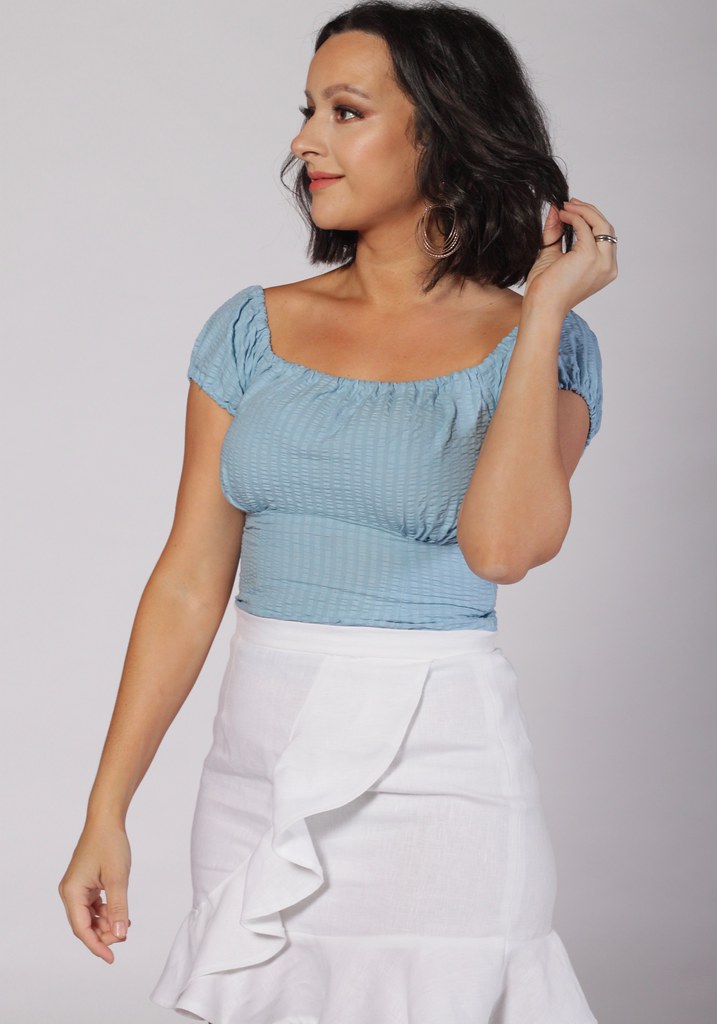
It's a vintage inspired, princess seamed top with an elasticised neckline, gathered bust, and two sleeve variations.

The sizes range from 2 - 16, with different pattern pieces for cup sizes B-DD.
I cut the size 6 with a D cup.

Skirt
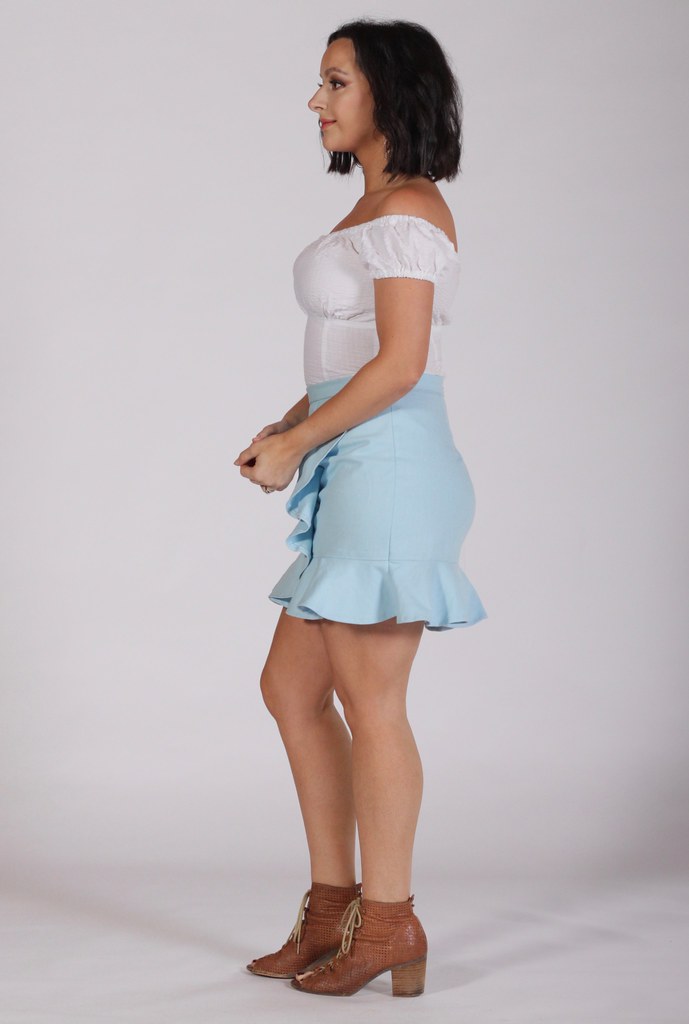
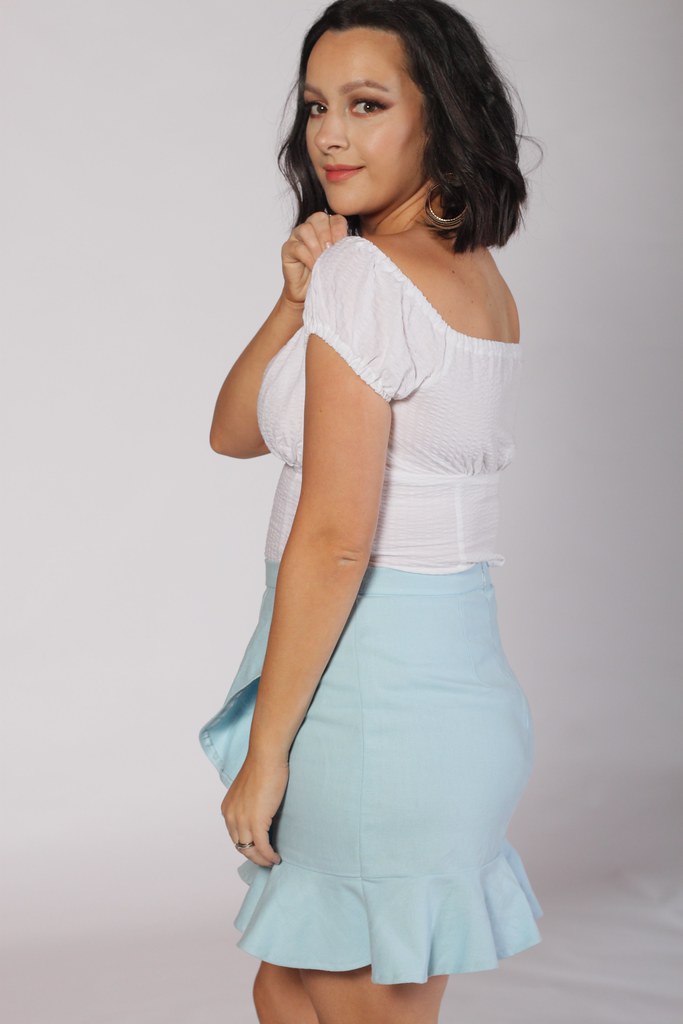
The skirt is a self-drafted faux wrap, with a flounce on the hem, a waistband, and an invisible zip closure down the centre back.

Rita Blouse and Flounce Skirt - Julia Bobbin

The Fabric

I used a cotton seersucker from Spotlight for the blouse.
It has a slightly heavier weight than a cotton lawn or voile and the texture of this lovely fabric elevates the look of the blouse when using a solid colour.

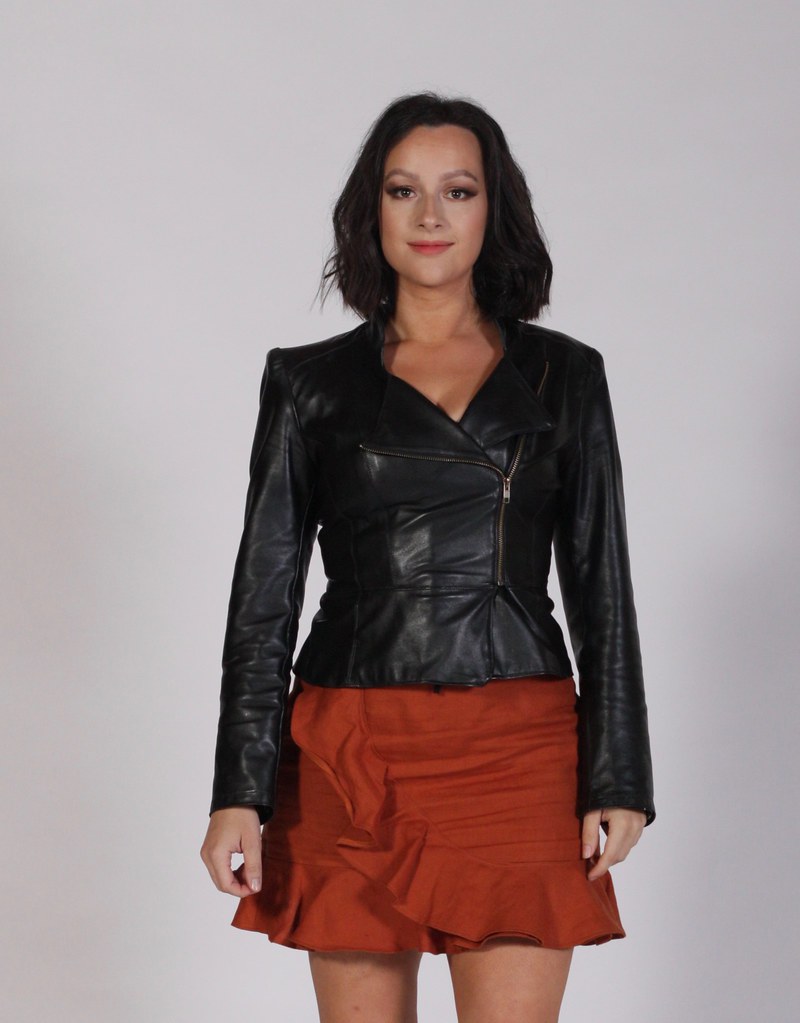
The skirt is made with a heavy-weight linen from The Fabric Store in Vintage Blush, White, Paprika and blue (but not the duck-egg blue).

Rita Blouse and Flounce Skirt - Julia Bobbin

Loves

I love that the sleeves can be worn up or off the shoulders, depending on the look (or mood) you're going for.
There are also two different versions of sleeves, the flutter cap or the elasticised version that I went for.
The bodice has princess seams which ensures a close and flattering fit. Princess seams are also great for making fit adjustments after you've sewn the seam.

I recently used this pattern to draft a dress that I made for the festive season,  which you can see below:


Rita Blouse and Flounce Skirt - Julia Bobbin

Conclusion

It's pretty clear that I love these linen skirts. They are so crazy comfortable and keep you cool in summer. They're easy to wash, keep their shape well and just get better with age.

The Rita blouse is versatile with low-key glamour and easy to mix with other wardrobe staples. These two patterns pair so nicely together and are the perfect go-to for a quick sewing project that you know you can finish in one session. WIN!

Rita Blouse and Flounce Skirt - Julia Bobbin

Friday, 14 April 2017

How I Organise My Sewing Pattern and Fabric Collection

Miss Maggie Rabbit (made by me) hanging out in my fabric cabinet.
Hello friends!

I have a lot of fabric and sewing patterns. Like, A LOT.

This post is all about how I organise my many sewing patterns as well as my fabric stash. So for those of you who are a little OCD, grab that bag of m&m's, sort the colours into different bowls (feels good doesn't it?!) and sit back and enjoy.

Sewing Pattern Storage

My sewing patterns used to sit in boxes where they ended up getting bent or torn or somehow mixed with another pattern.
I tried putting some in zip lock bags for a while, but it just added bulk and made it difficult to store.

I wanted to find a better way to:

  1. Store my patterns
  2. Preserve their quality
  3. Protect them from damage or ageing.

Just a few of my vintage patterns, pre-storage solution

I went searching the web for some solutions and came across the super informative blog post by Lladybird who used comic book storage for her patterns. I knew I had found the solution!!

With four people living in a two bedroom house, space is scarce!

Comic Book Storage for the WIN!
If there is another group of people out there more meticulous than seamstresses about preserving original quality, it's comic-book collectors!

The benefits of using comic book storage is that:

  1. Your patterns are stored in resealable bags
  2. Protected from dirt, dust and grotty hands.
  3. Backed by acid free boards to stop ageing and yellowing of patterns
  4. Holds patterns and instructions in place so they can't tear or get bent.
  5. Protects precious vintage patterns and enables you to handle them without damaging them.
  6. Uniforms the size of your patterns for easy storage and cataloguing.
  7. It just makes them look so darn good!

Vintage patterns all safe and secure
Directions:

  1. Place one board in a resealable bag.
  2. Slide the pattern envelope at the front of the board and pattern pieces behind the board (if pattern already used)
  3. Seal the bag. 

Lastly I stored them in comic-book boxes for protection and easy storage.

Cataloguing:
I found the easiest way to organise the patterns was by TYPE such as dresses, skirts, pants etc.
I then arranged them by PATTERN NUMBER, regardless of the brand. Only about 1% of my patterns didn't have a pattern number.

standard size pattern
For opened patterns, I store the pieces at the back behind the card

Large Vogue pattern

Storage Supplies
There are heaps of online sites that sell these (there are a lot of comic-book collectors out there!!) And I bought most of mine off eBay.

Below is the size dimensions of the packaging I used to store my patterns. I used two sizes in total:

Regular Size Patterns:
Smaller patterns such as Butterick, Simplicity, McCall.
  • Storage Boards (modern size) - Size 6 3/4" x 10 1/2"
  • Resealable comic bags - stores up to 6 7/8" x 10 1/2" (17.4cm x 27.6cm)
  • Box - outside dimensions -  8 1/4 x 11 1/2 x 16 3/4
  • Dividers

Large Size Patterns:
Large or bulky patterns such as Victory Patterns, Designer Vogue Patterns, Sewing Magazines, and print-at-home PDF patterns.
  • Storage Boards (magazine size) - Size 8 1/2" x 11"
  • Resealable comic bags - Magazine size - stores up to 8 3/4" x 11" (22.2cm x 27.9cm)
  • Box -outside dimensions - 9 x 11 3/4 x 15 3/4
  • Dividers
A printed PDF pattern in a large size bag. I wrote the details of the pattern on the front of the card and put the printed pieces at the back.
    printed pdf pieces at back
Sewing Pattern Electrical Organisation


I wanted to take my pattern organisation to the next level, and after reading Colette Patterns post about organising their patterns, I downloaded an iphone app (the same one they used) called 'Tap Forms' which is a data based app made for apple.
I'm sure there are other/better apps out there so let me know in the comments if you know any! 

What it does:

  • Allows you to create categories to sort your patterns
  • Makes cataloguing and searching for patterns you own, easy. 
  • Enables you to search through your patterns via the categories you've created, such as pattern company, decade, style etc.
  • Eliminates the need to handle your physical pattern when looking for pattern details such as fabric requirements.


The options are limitless but the categories that I currently have on my phone are the following:
  • photo of both the front and back of the pattern - this is great when you're at the fabric store and you need to know how much fabric and notions you need for your pattern.
  • Decade - I love being able to search for a particular vintage when flicking through my patterns.
  • Pattern Number
  • Pattern Company eg. Burda, Vogue, Victory Patterns
  • Garment Type - eg. Dress, skirt, pants.
  • Box Location - I have numbered my storage boxes and categorised by garment type and then in order of number, but this is a nice shortcut way of working out what box I've stored the pattern in without having to read the labels on the box.
  • Blog Review Link - If I have already used this pattern and blogged about it, a link to my blog post is a nice way to quickly access details on my previous make.
  • Note - For anything extra I want to put in, for example 'missing the sleeve piece'.


Fabric Storage

I recently sorted through my fabric, keeping only what I truely loved and got joy out of looking at. The rest I gave away to charity.

My fabric used to be folded and piled in a dark, lonely cupboard. No matter how neat I tried to keep it, it always looked messy, and you could never see the entirety of what I had.

Now my fabric stash looks like this:

Yes, that's lego on the top of the cabinet #mumlife

The Cabinet
I keep it stored in a glass cabinet called 'fabrikor' (perfect name much?) which I purchased from Ikea. It stands proudly in our lounge room for all to see. I love how my stash has gone from being a pile of shame in the linen cupboard, to an art feature that I constantly get enjoyment out of whenever I sit in the lounge.

How to

  1. Grab one of your large comic-book boards (so useful!)
  2. Fold your fabric in half, selvage to selvage and then again into thirds.
  3. Starting at one end of the folded length of the fabric, roll it around one large comic-book card paper.
  4. If needed, use one pin to keep fabric in place.


Folded in half and then into thirds
Place your board at one end of the fabric with a small amount wrapped around the edge.
Wrap the fabric around the board.

Electronic Fabric Organisation
I have also recently started cataloguing my fabric collection in the same app I use to catalogue my patterns. It's a great way to see what you own and how much of it you have. Also helps you to store certain information like fabric type, designer and where you purchased it which can easily be forgotten otherwise!

Mr. Basil Fox
Miss Maggie Rabbit
On a side note, meet my two little friends Mr. Basil Fox and Miss Maggie Rabbit!
Both were lovingly handmade by me using patterns from Alicia Paulson. Sometimes they like to sit in the fabric cabinet and feed off its joyful energy.

Both of the softies and all of their clothes were hand-sewn or knitted, except for Mr. Basil Fox's jeans, and Miss Maggie Rabbit's dress, which were machine stitched.

Conclusion

There is no doubt that this process takes time. You need to block off a few solid days and it can be tedious work, but once it's done it makes life so much easier. AND it's so easy to maintain.

Cataloguing a zillion patterns might be hard, but once they're done it only ever takes one minute to catalogue and store a new pattern as it comes into your possession. And speaking from my own experience the joy that I get from seeing all my patterns and fabric neatly organised and accounted for is profound.

There are plenty of fantastic different ways to organise fabric and patterns and this is just one of them, so go with what works for you.

Got any other great ways to sort and store fabric and sewing patterns? Or tried another app? I'd love to hear them!

 

Tuesday, 15 March 2016

Marimekko Dress - The Vintage Edition

Julia Bobbin - Marimekko Dress

Vintage dresses; no matter how much I love my modern fashion, sewing classic styles feels like home to me.

Here's one of my latest dresses that takes me back to my roots. The pencil shaped skirt and fitted bodice makes me think 'Mad Men' and answers my daily inner questions of WWJW? (What Would Joan Wear?)

Julia Bobbin - Marimekko Dress

The Pattern
I pulled out one of my all time favourites and most used patterns; Butterick 5603. I used the bodice of this pattern in version B, and added a pencil skirt instead of the full skirt like I have done many times in the past.

How many times have I used this pattern now? Oh, just a lazy SIX times. No biggie.

 the first step is admitting you have a problem

 Julia Bobbin - Marimekko Dress
Julia Bobbin - Marimekko Dress

Fabric
Oh. Em. Gee. This. Fabric.
This gorgeous fabric is by the designer Marimekko and printed onto a heavy weight cotton.

It's from Yulki's Home Decor which is a beautiful site dedicated to designer fabrics and they have a wide range of Marimekko fabrics. Sadly the site will be closing down soon but a lot of fabrics will still be available in their etsy store.

Julie from Yulki's Home Decor has offered my readers an 18% discount store wide on all available fabrics before the website closes down. Just enter the code "special" at checkout.

Julia Bobbin - Marimekko Dress

Details
I love the little ties on this bodice. It adds such a sweetness to the dress, and the heavy cotton fabric gives shape to the ties without the need to interface.

Julia Bobbin - Marimekko Dress
So BOW-tiful

I highlighted the beautiful panelled design of branches and magenta berries by placing the pattern in the centre, with the top and bottom of the dress being white. This meant I had to cut my pattern pieces across the grain line, rather than along the grain line.

Julia Bobbin - Marimekko Dress

The bodice has a V shaped front and back and an invisible zipper down the centre back.h

Julia Bobbin - Marimekko Dress

Thanks to the sturdiness of this heavy cotton fabric, I went the easy option and didn't line it. It breathes easy and feels very structured so is very comfortable to wear!

Julia Bobbin - Marimekko Dress


The dress has an empire bodice cut just under the bust, and the skirt has four darts at the front, and two at the back, all perfectly hidden amongst the beautiful fabric design.

Julia Bobbin - Marimekko Dress


Conclusion
Here in the Southern Hemisphere us gals are packing up our summer gear and pulling out the knitting needles as we say goodbye to Summer *sniff* and hello to Autumn.
This cheery spring dress seems like a poetic goodbye to our warm weather as we hold onto these last few warm weeks.

I love how this dress turned out and feel happy to have finally made my very own Marimekko dress! Don't forget about the 18% discount code 'special' at Yulki's Home Decor if you are wanting to get your hands on your own Marimekko.

Hope you all have a fabric filled week! xx

Julia Bobbin - Marimekko Dress