
Julia Bobbin Header Image and Menu Past Projects Tutorials Celebrity Copy Cat Awards About Me
Showing posts with label DIY. Show all posts

Sunday, 3 May 2020

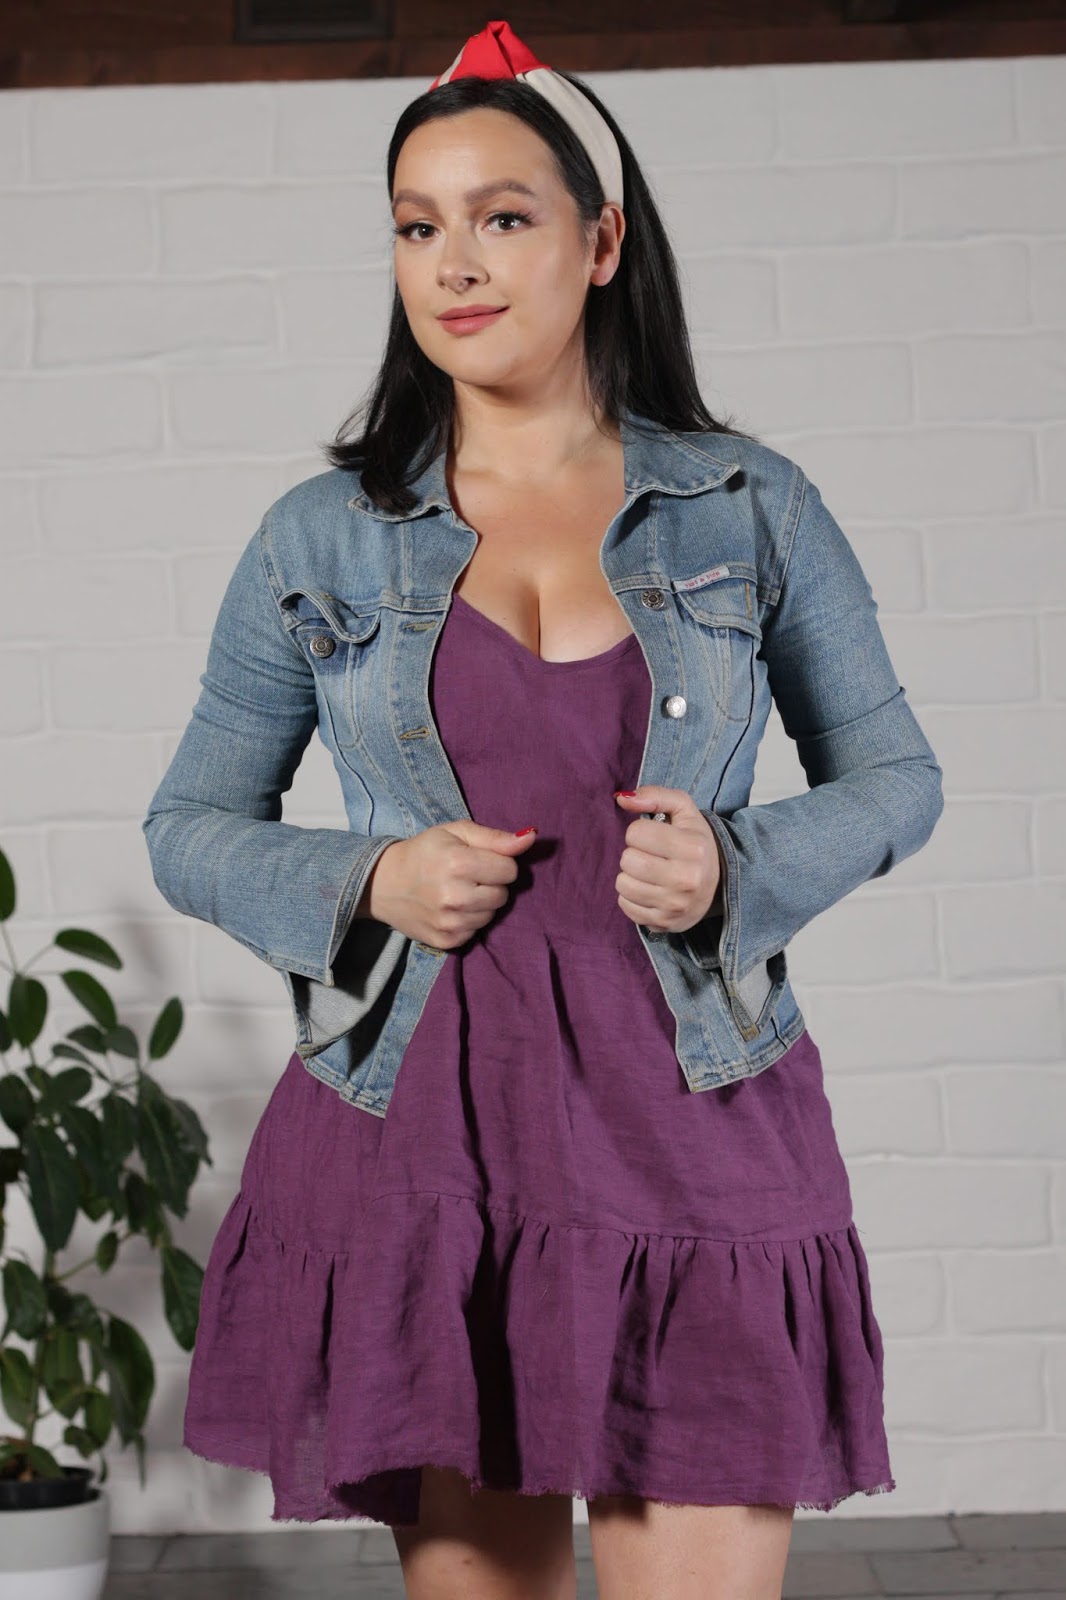
DIY Linen Summer Dress - a Mini Tutorial

Julia Bobbin - DIY Linen Summer Dress

It's a summer dress! Just in time for winter in Australia!

I made this dress when the weather was still nice, and it got a LOT of wear, let me tell you!
It's comfy, it's pretty, and it can be dressed up or thrown over bathers; it's a win-win!

Julia Bobbin - DIY Linen Summer Dress

The Fabric

I used the 'linford grape/ washed linen from Tessuti Fabrics.
It's a light weight (110gsm) vintage washed linen that feels like you're wearing nothing!

Julia Bobbin - DIY Linen Summer Dress

DIY YOUR OWN!

This was such a quick and easy make that I hacked using a camisole pattern and you can too!

The Bodice
Grab a cami pattern that you have tried and used in your stash!
I used The Misty Cami from Sew Altered Style and eliminated the centre front seam by cutting it on the fold.

Find the waistline on the pattern and mark draw a line to mark it. Cut out a bodice front and back from the waistline mark upwards.

Construct the bodice as per the pattern instructions, leaving the waist unfinished.

The Skirt
The skirt part of the dress is two long rectangles that have been gathered and attached in tiers.

SWIPE the photos below to see the mini tutorial below on how to draft the skirt:


The Hem
To add to the relaxed look of the linen, I machine stitched along the hem circumference, 1.5cm from the raw edge. I then frayed the edges up to the seam-line.

Final Thoughts

This was a quick and easy make and such a great addition for a warmer climate. I can definitely see me making more of these dresses for next summer!

Julia Bobbin - DIY Linen Summer DressJulia Bobbin - DIY Linen Summer Dress

Friday, 13 March 2020

TWO Tutorials - Couture Rolled Hem + Hand Pick Stitch AND a Silk Slip Dress

julia bobbin
julia bobbin

Hi sewing friends!

Today I have two mini hand sewing tutorials to share with you, and a fresh new silk slip dress!

The Dress

Made with the most divine, 22mm silk satin from Tessuti Fabrics, this self drafted cowl neck dress features:
  • fully lined in a beautiful chocolate silk satin from The Cloth Shop
  • French seams
  • Bias cut silk
  • pick stitched underlining
  • bias cut spaghetti straps
  • hand rolled hem
I love taking a simple dress and making it 'extra' by adding couture techniques, such as a hand pick stitched lining instead of a machine under stitching.

Hand Sewing Is Your Friend!

Typically, when we think about hand sewing we associate it with 'hard work', but friends, I am here to tell you that hand sewing is misunderstood!

I used to do everything I could to avoid hand sewing, associating it with the chore part of making a garment; necessary but not enjoyable.
Looking back I realised that the reason I felt that way is because I never really understood HOW to do it, and didn't appreciate how transformative and useful it was to a garment.

Once you realise the benefits of hand sewing and learn how to do it (it's actually easier than using a machine!) the dread is taken away. In fact in my experience I now actually enjoy it! Now I look at patterns to see where I can actually substitute machine sewing for hand sewing.

So what are the benefits of hand sewing?
  • AESTHETICALLY PLEASING - there is nothing quite like hand finished details on a garment. It signifies couture and indicates the amount of effort and love put into a garment. The slight variations in stitches that are typical of a hand stitch, are in stark contrast to the uniform flat stitches of a machine.
  • THE CONTROL - Hand sewing allows you to be exact. You can manipulate the fabric in front of you and place it exactly where it needs to go. 
  • KINDER TO YOUR GARMENT - When you sew on the machine, you're forcing your whole garment under one small space, the needle. With hand sewing, you can sew with the garment on your lap, on a dress from, standing and sitting. You work on just the relevant area and don't add stress to the rest of the garment.
  • DELICATE FABRICS -When sewing with fabrics such as silk, hand stitching allows you to use less thread, and control the amount of layers you want the stitch to go through. On a machine the thread is continuous and goes through all of the layers, which can distort the fabric. Ever tried sewing a machine stitched narrow hem on bias cut silk chiffon? It's almost inevitable to end up with a hem that is twisted in some spots. This is basically non existent on a hand rolled hem.

The Hand Rolled Hem

SWIPE for left and right-handed views.

I am currently having a love affair with hand rolled hems. It just seems to be one of those things that once you've tried it, nothing else compares.

Not only is a hand rolled hem visually pleasing with it's tube like plump finish, it is also mesmerising how it works! Making those stitches and then pulling the thread and watching them roll, is some sort of sewing magic. WATCH the first video above to see it in action!

As with anything, there are many ways to roll a hem, but the above is how I do it.
There are two types of finishes for a hand rolled hem: The Italian and The French finish.

THE FRENCH rolled hem has the roll turned to the 'wrong' side of the fabric, which is typical for dress and skirt hems.

Above is an example of a French rolled hem, where the roll is on the 'wrong' side of the fabric.
This silk/wool blend pocket square is from Gentelman's Gazette.
THE ITALIAN rolled hem, and my personal favourite, is where the roll is turned to the right side of fabric. 
This is a typical finish on couture pocket squares (my other current obsession) and scarves and a favourite for couture houses such as Hermes (which is French; the irony!).

An Italian rolled hem, the roll is visible on the 'right' side of the fabric. The above silk twill pocket squares are from Rampley & Co
The Hand Pick Stitch

SWIPE for left and right-handed views.

A pick, or prick stitch refers to small, subtle back stitches that can be used to under-stitch a facing or lining (as I've done in the above video for my slip dress), or as decorative top stitch on garments such as lapels and pockets.

A hand pick stitched lapel on a suit is a strong indicator of a bespoke, high quality suit. Because of this, many 'ready-to-wear' brands use pick stitching on their garments to make it look high-end, but when you look up close, the uniformity of the stitch is a clear give away that it was done by machine.

A hand pick-stitch has slight irregularities and is usually done with a silk thread. Once you see the difference it's quite easy to spot.
A subtle, hand pick-stitched lapel from bespoke tailors Burdi Clothing
Final Thoughts

The more I go down the rabbit hole of couture sewing, the more I fall in love with it and want to learn more! 

What excites me the most, is that these techniques, though they may take a bit more time than a machine, are not complicated or reserved for the experienced and highly skilled. They are repetitive, easy enough stitches that home sewers can achieve whether beginner or advanced.

The end result is something beautiful, well engineered and a push back on fast fashion where everything is mass produced and not built to last. Hand sewing for the win!

julia bobbin

Tuesday, 15 March 2016

Marimekko Dress - The Vintage Edition

Julia Bobbin - Marimekko Dress

Vintage dresses; no matter how much I love my modern fashion, sewing classic styles feels like home to me.

Here's one of my latest dresses that takes me back to my roots. The pencil shaped skirt and fitted bodice makes me think 'Mad Men' and answers my daily inner questions of WWJW? (What Would Joan Wear?)

Julia Bobbin - Marimekko Dress

The Pattern
I pulled out one of my all time favourites and most used patterns; Butterick 5603. I used the bodice of this pattern in version B, and added a pencil skirt instead of the full skirt like I have done many times in the past.

How many times have I used this pattern now? Oh, just a lazy SIX times. No biggie.

 the first step is admitting you have a problem

 Julia Bobbin - Marimekko Dress
Julia Bobbin - Marimekko Dress

Fabric
Oh. Em. Gee. This. Fabric.
This gorgeous fabric is by the designer Marimekko and printed onto a heavy weight cotton.

It's from Yulki's Home Decor which is a beautiful site dedicated to designer fabrics and they have a wide range of Marimekko fabrics. Sadly the site will be closing down soon but a lot of fabrics will still be available in their etsy store.

Julie from Yulki's Home Decor has offered my readers an 18% discount store wide on all available fabrics before the website closes down. Just enter the code "special" at checkout.

Julia Bobbin - Marimekko Dress

Details
I love the little ties on this bodice. It adds such a sweetness to the dress, and the heavy cotton fabric gives shape to the ties without the need to interface.

Julia Bobbin - Marimekko Dress
So BOW-tiful

I highlighted the beautiful panelled design of branches and magenta berries by placing the pattern in the centre, with the top and bottom of the dress being white. This meant I had to cut my pattern pieces across the grain line, rather than along the grain line.

Julia Bobbin - Marimekko Dress

The bodice has a V shaped front and back and an invisible zipper down the centre back.h

Julia Bobbin - Marimekko Dress

Thanks to the sturdiness of this heavy cotton fabric, I went the easy option and didn't line it. It breathes easy and feels very structured so is very comfortable to wear!

Julia Bobbin - Marimekko Dress


The dress has an empire bodice cut just under the bust, and the skirt has four darts at the front, and two at the back, all perfectly hidden amongst the beautiful fabric design.

Julia Bobbin - Marimekko Dress


Conclusion
Here in the Southern Hemisphere us gals are packing up our summer gear and pulling out the knitting needles as we say goodbye to Summer *sniff* and hello to Autumn.
This cheery spring dress seems like a poetic goodbye to our warm weather as we hold onto these last few warm weeks.

I love how this dress turned out and feel happy to have finally made my very own Marimekko dress! Don't forget about the 18% discount code 'special' at Yulki's Home Decor if you are wanting to get your hands on your own Marimekko.

Hope you all have a fabric filled week! xx

Julia Bobbin - Marimekko Dress

Monday, 2 June 2014

Pro bono - Kimono

Julia Bobbin Silk Kimono

I don't know when - I don't know how - I don't know why, but I suddenly came over with the urge to own a silk kimono. 

Then I stumbled across this online tutorial over at Elle Apparel and I fell in love. Basically you could say her awesome and free tutorial is a 'pro bono - kimono'. Yes I love it because it rhymes. Sorry not sorry.

I just feel like a lady wearing this thing youknowwhatI'msayin?!!

Julia Bobbin Silk Kimono

Details

Using this tutorial I was able to create this little beauty in two hours, that inludes the time it took to cut it out. Whhhhaaaaat?!

It's a great pattern for the beginner seamstress and the perfect accessory to pretty up any outfit.

Julia Bobbin Silk Kimono

Fabric
I used about 1.15 metres of a stunning designer silk that I purchased from The Fabric Store in Melbourne. Have you seen anything as beautiful as this? I mean come on, it has gold leaves through out the pattern! My heart!

Julia Bobbin Silk Kimono

Changes
Instead of cutting the measurements out directly onto the fabric, I made pattern pieces first on paper and then used those to cut out the fabric.

I also used french seams to piece the kimono together instead of just serging the edges. It takes longer, but it makes the delicate fabric look neater on the inside. This quick to make kimono would be even faster how ever if you just serged all the edges together.

Julia Bobbin Silk Kimono

I also attached the sleeves flat onto the bodice front and back before I joined the side seams together. I then sewed the side seams of the bodice and the sleeves all together in one go. This makes it easier to work out the positioning of the sleeves.

Julia Bobbin Silk Kimono

Conclusion
I love this look, and I especially love how fast and easy it is to make! I already have ideas for more as they are the perfect way to glamorise any outfit.

Harry and I also had a great time taking photos in the park. This guy just loves being outside.

So anyone else have a craving for a kimono? You're not alone! Have a great week everyone!

Julia Bobbin Silk Kimono
