
Julia Bobbin Header Image and Menu Past Projects Tutorials Celebrity Copy Cat Awards About Me

Tuesday, 20 August 2013

Tutorial: How To Move Darts without slashing your pattern


Well poke me in the eye with a seam ripper. I can't believe it's been over 2 1/2 months since my last blog post! I blame in part seasons 1-3 of 'The Walking Dead'; what is it about a zombie apocalypse that is so freaking addictive? But mainly I have been a very busy lady.

Here's a quick catch up:

  • I just got back from vacationing in Italy (amazing!!) with a six month old child (wow) and bought myself a lot of stunning Italian leather and lace
  • I'm currently a judge in the fabulous 'Super Online Sewing Match' hosted by Sew Mama Sew which is absolutely inspiring. Check the competition out if you haven't already!
  • I'm also involved with another exciting upcoming project which I can't tell you about yet, but I'm so looking forward to. Oh how sneaky! 
  • I'm taking part in the Handmaker's Factory Miette Cardigan Knit-A-long and you should too! Yeah that's right, I knit now; like a boss. 
  • I've made a bunch of clothes that I will be posting about soon.
  • Just completed a short course in Pattern Making and absolutely loved it! I am a little bit in love with Kate the teacher who knows her shiz.
  • And finally, you may have noticed that my blog has been given a bit of a make over!


Tutorial: How to move a dart

One of the simple and effective things that I learnt and loved from my recent course in Pattern Making, is how to move darts and and create design lines without cutting and slashing your pattern. It amazes me how easy this is. Maybe you have a bodice you want to make out of lace and the darts are in a position that interupts the flow of the lace pattern. This tutorial will show you how to move that dart to where ever you choose.

Things you'll need:
  • Bodice pattern piece
  • Tracing paper
  • Pencil and eraser
  • Ruler
  • Awl
  • Tracing wheel
  • One Long Island Iced Tea - for pattern making inspiration
  • Really old nail polish job. Wow my nails look ah-maz-ing

Let's Do This

Summary
The images below show the original pattern with two darts, and our final pattern with the darts moved into one at the side.


Tracing your original pattern

1.  Get your bodice front pattern piece. Trace off a copy if you don't want to mark your original. I have drawn mine onto a piece of cardboard for more stability.
Note: My pattern piece doesn't have seam allowance added yet. I find it easier to see the true shape of the pattern without getting confused with allowances.


2.  Find your bust point on your pattern and make a mark there for your reference. The bust point is drawn in blue, and the original darts I have drawn in red.
Tip: If your pattern doesn't have the bust point marked, hold up the pattern piece on yourself or on a dress form and mark with a pen the fullest point of your bust. This will be your bust point. Generally the darts are pointed towards the bust point.

3.  Draw a circle around the bust point with a radius of 3cm. You can see mine in green.
Note: The length of the radius is up to you, generally the smaller circle is for a smaller bust and the larger for the fuller bust.


See that lovely circle we just made around the bust point? That's our no-go dart zone. This will make sense soon.

Positioning your new dart

4.  On your pattern piece draw a line where you would like your dart to go. Your line will need to start from the edge of the pattern piece and finish at the bust point. I have done mine in pencil.
Tip: If you are moving a dart to a side seam, draw the line on an angle and not horizontally which is more flattering and looks more pleasing to the eye.


5.  Place your pattern piece on top of a large piece of blank tracing paper. Mark on your tracing paper where your bust point is.

Starting at the line you have just drawn you are going to trace your pattern piece in one direction, until you come to your first pre-existing dart.
Tip: Keep the pattern piece as steady as you can to avoid distorting the shape. Place a weight over the centre if it helps.

Julia Bobbin - Tutorial: How to move darts - Bodice front

Closing off the original darts
In the next steps we are going to remove the original darts and create our new dart.

6.  Once you come to your first dart, mark a notch at the first dart leg for your reference. Using your awl at the apex of your dart carefully pivot your pattern piece until the second leg of the dart lines up with the notch of the first leg.
Tip: If you don't have an awl, you can use a sharp pencil or the point of a fine pair of scissors to act as your pivot tool.

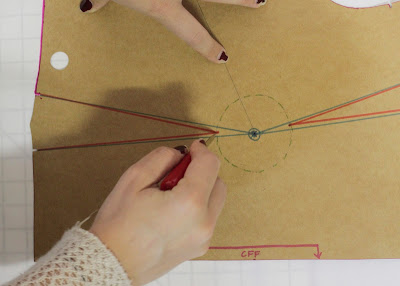
 Julia Bobbin - Tutorial: How to move darts - Bodice front
Julia Bobbin - Tutorial: How to move darts - Bodice frontJulia Bobbin - Tutorial: How to move darts - Bodice front

See how the pattern piece has now moved?! You have just closed off that dart!
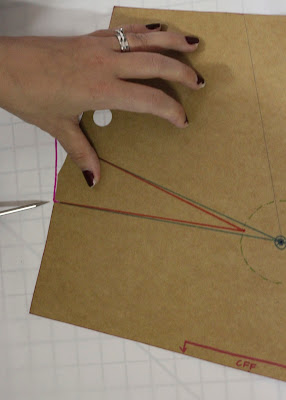
Julia Bobbin - Tutorial: How to move darts - Bodice front

7.  Continue tracing around the pattern piece until you come to you next dart and repeat the process.

Julia Bobbin - Tutorial: How to move darts - Bodice frontJulia Bobbin - Tutorial: How to move darts - Bodice frontJulia Bobbin - Tutorial: How to move darts - Bodice front

Once you have no more darts on your pattern, continue tracing until you come to your dart line that you drew on to your pattern piece and stop.


Completing the new dart

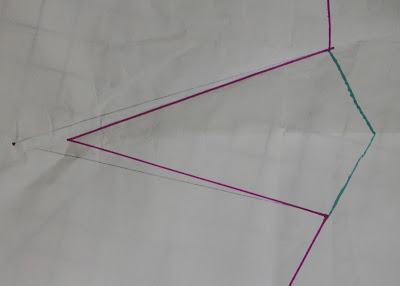
8.  Remove your pattern from the tracing paper and have a look! See that big open gape, that's your new dart! (almost)


9.  With a pencil and a ruler, draw in your dart legs going all the way into the bust point.


Remember your no-go dart zone? Make a mark at the edge of the bust circle (3cm away from bust point), making sure that it is centred between the two openings.


10.  Draw your two dart legs from that new apex to the openings on your pattern piece. This is your new dart! Depending on how close the base of the dart is to the bust point, will determine how long or how wide the dart is. But don't worry, the dart value is still the same.
Tip: Both dart legs should be exactly the same length, so get your ruler and make sure they are the same.

Julia Bobbin - Tutorial: How to move darts - Bodice front

11.  Now you will carefully fold one of the dart legs to meet the second so that the dart is closed off. Score the new dart legs with a pen or pencil to make it easy to fold.
Tip: The direction of the dart is up to you, but generally the bulk of the dart is folded towards to the centre of the garment.
Tip 2: By folding your dart you're making the piece 3D. To make it easier to fold, place the apex of the dart on the corner of a table.

Julia Bobbin - Tutorial: How to move darts - Bodice front

12.  If traced correctly, your two dart legs should meet so that it becomes one continuous line. With your tracing wheel, trace over the dart edge where the bulk of the paper is folded under.

Julia Bobbin - Tutorial: How to move darts - Bodice front

13. Open up your pattern piece. The dots on your pattern made by your tracing wheel is the finished shape of your dart. Trace over it with a pencil.
Tip: If you don't have a tracing wheel, use an awl or the edge of a pair of scissors to mark along the line instead.

Julia Bobbin - Tutorial: How to move darts - Bodice front

14.  Add your seam allowance to your pattern piece  and you're done! You now have a new bodice with your measurements, but with the dart in a different spot!

15.  It's Long Island Iced Tea time - you're done!

What do you think guys? Are you going to give this a go?
Have fun with your new patterns!

Julia Bobbin - Tutorial: How to move darts - Bodice front
1. Starting the knit-a-long 2. Fabric splurge in Italy 3. My finished knitted sleeve 4. Harry and I on the beach in Italy.

Sunday, 19 May 2013

Winter Lace Dress - Laurel by Colette Patterns

So I'm another year older now. When did that happen?!! I remember I couldn't WAIT to turn 18; boy did that backfire ... now I break into sobs of gratitude if by some fluke I get asked for ID.

I like to claim the whole month of May as my birthday. Sorry, not sorry.

Me: 'Husband dearest, can I eat the last piece of pizza'
Husband: 'You've had every other piece!'
Me: 'But it's my birthday MONTH'
*Sound of husband banging head against the wall*

I also half seriously think that all this Me-Made-May-Mania going around is in my birthday honour.

Awkward. But hey, look! I made a dress!

Julia Bobbin: Laurel dress by Colette Patterns

The Pattern
It's the Laurel by Colette Patterns in a straight size 10. A great easy pattern to whip up, with lots of different variations. A great wardrobe filler, a flattering cut and a great first pattern for beginners.

Julia Bobbin: Laurel dress by Colette Patterns

Fabric
Lace from The Fabric Store and underlined with a cotton poplin. The lace is gorgeous and I normally love sewing with lace, but this one was an a-hole to sew with. It was a thin, super stretchy cheap lace that I purchased because, hey, I love lace and it was pretty. But I should have known better. It took so much extra time cutting this maddening fabric because each piece kept stretching out like pizza dough, and not in a good way. Great. Now I'm hungry.

Alterations
Amazingly, I didn't have to make any changes to the structure of the dress, I just sewed it up in a straight size. The changes I made were just in the finish of the dress.

I underlined the dress as per the instructions,  but made the underlining hem slightly shorter than the lace hem so that I could feature the scalloped edge. I cut into the lace fabric to create a scalloped edge, as the fabric didn't come with a scalloped edge. I featured it on both the skirt and the sleeve hem.

Julia Bobbin: Laurel dress by Colette Patterns

I annoyingly didn't buy enough of the lace fabric (another reason I wanted to punch the lace in the face) and so had to either lose the sleeves or cut the dress shorter. Wah! After scooping my heart off the ground, I decided to sacrifice the hem length which made the dress pretty teeny tiny. Perfect with leggings as a sort of long top, but not so appropriate with out.

Pattern matching and underlining
I took extra time carefully cutting out the lace so that the pattern on the lace matched down the centre front and back of the dress and the sleeves. I also made sure that the scalloped edge matched around the entire width of the hem. 
It's so worth the extra effort and makes the dress look cleaner. The simple shape of this dress really allows for perfect lace matching as the lace pattern doesn't get lost in a gazillion seam lines.

The pattern comes with great underlining instructions. Underlining is great for laces, sheer and light weight fabrics. You can also check out my own underlining tutorial here.

Julia Bobbin: Laurel dress by Colette Patterns

My thoughts
I love the classic 60's silhouette of this shift dress. You all know I'm a little bit crazy for Mad Men Fashion, so there was never any indecision over whether I would make this dress. Speaking of Mad Men, did you see how amazing all the dresses were in the Mad Men Challenge? Amaze-balls!

Even though this particular lace fabric was a menace to sew with, I'm really happy with the end result. The colour and the drape are really nice, and it's a bright happy shade to cheer up my recently dusted off winter wardrobe. As you can see in the pictures, when it gets dark and gloomy outside I rebel with colour.

Julia Bobbin: Laurel dress by Colette Patterns

Styling
For those of you who are wondering how I did my hair, I used this tutorial from my pinterest to get the effect.

Julia Bobbin: Laurel dress by Colette Patterns

The necklace is a handmade, hand painted wooden piece that I purchased from the Sew Little Time shop on Etsy. I'm a little bit in love with this store at the moment. Who wants to buy me something? It is my birthday MONTH *cough* 

Julia Bobbin: Laurel dress by Colette Patterns

I've seen so many amazing Laurel dresses around lately. It amazes me how you can have one pattern, but with different fabric and a different seamstress you can end up with a completely different looking dress. It tickles my creative fancy.

Julia Bobbin: Laurel dress by Colette Patterns

So what do you think? Have you made this pattern? Are you going to give it a go? Is it your birthday month too? (It can't be, it's MINE ... just kidding-ish)

In all seriousness though, I love birthdays and I'm proud to be getting older. It means that I'm still alive. With each extra candle, each extra wrinkle, each extra grey hair we are given the opportunity to make more dresses. How lucky we are. 

Sunday, 5 May 2013

Mad Men Challenge 2 - THE BIG REVEAL!!

Ladies and gentleman, the results of the Mad Men Challenge are here and I am overwhelmed with the number of entrants and the quality of all the creations submitted. You guys look so amazing it hurts my head!
Now let the drooling begin!!

Click on the buttons below to see all your inspired creations for each character:

Julia Bobbin Mad Men Challenge: BIG REVEALJulia Bobbin Mad Men Challenge: BIG REVEALJulia Bobbin Mad Men Challenge: BIG REVEAL

Julia Bobbin Mad Men Challenge: BIG REVEALJulia Bobbin Mad Men Challenge: BIG REVEALJulia Bobbin Mad Men Challenge: BIG REVEAL

Julia Bobbin Mad Men Challenge: BIG REVEALJulia Bobbin Mad Men Challenge: BIG REVEALJulia Bobbin Mad Men Challenge: BIG REVEAL


Julia Bobbin Mad Men Challenge: BIG REVEALJulia Bobbin Mad Men Challenge: BIG REVEAL

Is your outfit missing? Please email me at   julia[at]juliabobbin[dot]com   if your outfit is not showing!


Some fun facts:

122 Outfits
Joan with 32% , Betty with 26% and Megan with 13%
Most inspired garment: This beautiful Betty dress was made 5 times
Julia Bobbin Mad Men Challenge 2013 - THE BIG REVEAL!!


GIVEAWAYS
Congratulations to the following entrants who were randomly selected using www.random.org and have won the following prize:

Rachel from Layer Stitch Repeat has won a $25 gift voucher to buy stunning vintage patterns from Patterns From the Past www.oldpatterns.com

Rachel from House of Pinheiro has won this beautiful vintage brooch below from the vintage Ruemiraldi store


Alimcfadian from The key to sudden madness has won this beautiful vintage brooch below from the vintage Ruemiraldi store

Sew Lonnie from Sew Lonnie has won this awesome Butterick pattern #5603 curtesy of the very lovely Majella from NSW, Australia.

I will be in touch with you individually by email in the coming week to organise delivery of your prize!
A big thank you to Patterns from the Past, Ruemiraldi and Majella for these fabulous giveaways!


Thank you to this AMAZING sewing community who took part in the challenge. I was inspired by every email that found its way to my inbox. You are such clever, and ridiculously well dressed ladies!

Julia Bobbin Mad Men Challenge: BIG REVEAL

Sunday, 28 April 2013

Colette Voucher WINNERS! + Vogue 1108


Thanks guys for all your lovely words of support (and angst) over google reader breaking up with us. It was daunting at first, but now I've embraced other site readers and I have come to realise that google reader and I were just heading in different directions. Thank you also to the two tubs of ice-cream that supported me through the trauma.

COMPETITION WINNERS!

So with out further ado, here are the four lucky readers who each win a $50 e-voucher for Colette Patterns. Each winner was randomly selected using www.random.org 

Betty Stitchup
Aisha K
Miss Jackson
Eve and the apple tree

Congratulations lovelies! Please email me at julia@juliabobbin.com to redeem your prize.


This week I wanted to share with you a little Smurfette number that I made quite a while ago but haven't blogged about. When I say a while ago, I mean before I housed a human in my gutsies and these photos were taken back then also.

But hey, it's blue, it's pretty and it looks very Mad Men-ish don't you think? Very similar to this green number that Joanie-Joan wore in the promo shots:


Except that in Joan's photo she hasn't had one two many wines before taking the shot...

The Pattern
The pattern is Vogue 1108 and is lined, with an invisible zipper at the side. The bodice has a foundation with boning and a big crazy pleating system which ended up making a really nice feature on the front of the dress. Pattern pieces all start to look the same, so it was a real treat opening up the front pattern piece of the dress, which looked like a broken tree and wondering how the H it's going to end up looking like a dress.

The Fabric
A silk dupion that remarkably I got on sale; that never happens to me! I love dupion as it shapes so well and really knows how to absorb a colour.

Stash busting 101
I used a combination of left over silk scraps that I had in my stash to make the foundation. The foundation is hidden between the shell of the dress and the lining so it didn't matter what colours I used.

Instead of using silk organza for the interfacing, I used 'shapewell' which is a sturdy interfacing with the same sort of qualities as organza but a heck of a lot cheaper.


Pattern Changes/Alterations

The dress has self piping along the neckline which I omitted. I thought there was enough going on with the dress that I didn't need any extra details.

The hem sits a bit longer on me, instead of above the knee as the pattern describes and I like the little extra length. This could have more to do with my short-ass-ness than anything else.

I sewed both shoulders closed and bagged them out, instead of keeping one shoulder open and finishing it with hook and eyes. I thought that it made the dress a bit neater and finished, and it was easy enough to lift the dress above my head to put on, instead of stepping into it.

When I first made my toile for this dress (how very disciplined of me!!) I found that I was swimming in the upper back and that the shoulders kept sliding down my arms. That was with the bodice at a size 12! I have a short torso, but this was just cray-cray.
I ended up reducing the back by a whooping 7 cm on both sides. Other reviewers also found the back a bit big so be wary when making this dress and make a toile first! You can see in the above photo how I reduced it at the back and then created a new cutting line, filling in the space that the dart created. I drew diagonal lines in the space so that you can see. I then transferred these changes onto the facings, foundation and linings.

I used shapewell interfacing again instead of organza for the bow which reduced the floppiness. I also tacked the top of the bow to the dress to avoid it collapsing.


Conclusion
I really liked the elegance of this dress and how it turned out. I got to try out boning for the first time, and I loved how the dress fitted and sat so lovely once it was added.
The dress was a massive effort with 28 pattern pieces that needed to be cut out, two different types of interfacing, lining, foundation and dress fabric. Thank God I made this dress BEFORE the baby was born!


So guess what?!! Only one more week until the MAD MEN CHALLENGE BIG REVEAL!! The dresses are AMAZE-balls! I am so impressed with the number and the quality of entrants that my brain hurts. HURTS I tell you. Thanks to everyone who took part; I can't wait to share them all with you next week.

Tuesday, 16 April 2013

Colette Patterns 4 x $50 e-Voucher GIVE AWAY and Goodbye Google Reader


Hello sewers and sewer appreciators (the needle and fabric type, not ninja turtles living underground in actual sewerage type),

Have you ever wondered what it would feel like to be punched in the face by the internet? Well I recently found that out. Turns out daddy google doesn't want to play with google reader any more and is giving it the virtual boot.

What does that mean? Well it means us bloggers who write and read blogs using blogger/blogspot, can no longer follow other blogs using this bad boy:


Google Friend Connect.

What? WHAT?!!? Yep, when we log into our blogs we can't see posts by our favourite bloggers, and our readers can no longer see our blog posts. Still don't know what the H it is? Click here for a bit more info. Effectively you lose a whole bunch of readers to your blog.

Ugh. Well that sucks.
After kicking and flailing my arms and legs around on the kitchen floor to no avail (I DO love a tempter tanty), I decided to look at other options. On a side note, I should REALLY wash my kitchen floor ...

If you currently read my blog with Google Friend Connect, you can stay up to date with my posts by subscribing via email:


By following my blog on Bloglovin'


Or by using Feedly. I haven't played around with this site yet, but it looks like you can transfer the blogs that you follow currently with google reader over to this new platform.

I have starting shifting all of the blogs that I follow over to bloglovin' so I can keep track of new posts. The interface is similar to google reader and I do love how easy it is to use. But I'm still grumpy about it. Don't know what Bloglovin' is? Click here for the run down.

To cheer us all up I decided to do a giveaway:

The Prize:


4 x $50USD e-vouchers for Colette Patterns online store

To WIN:

Follow my blog through Bloglovin' or via email (or heck, anything other than google reader) and comment on this post.

If you already follow my blog through one of these means, then you are welcome to enter as well!

Four lucky peeps will be randomly selected and each will win one $50 e-voucher.

Entries are open to everyone from anywhere in the world. 
Entries close on Friday, April 26th, 2013
The winners will be announced in a blog post on Sunday, April 28th, 2013


So is anyone else put out by the latest news from google? Discovered any great ways to keep up to date with your favourite blogs? Know how to give kitchen floors a good clean?

Let me know!

P.s. - Don't forget to email me your pictures for the Mad Men Challenge An extension has been given until Monday, the 22nd of April so we can work on our projects over the weekend.
I can't wait to share all amazing outfits you guys have made. Such a talented community!
